SECURITY EDUCATION, PRIVACY GUIDANCE, THREAT AWARENESS, OPEN SOURCE TOOLS, RESEARCH NOTES, AND RESPONSIBLE TECHNOLOGY CONTENT

  • Penetration Testing Distribution - BackBox

    BackBox is a penetration test and security assessment oriented Ubuntu-based Linux distribution providing a network and informatic systems analysis toolkit. It includes a complete set of tools required for ethical hacking and security testing...
  • Pentest Distro Linux - Weakerth4n

    Weakerth4n is a penetration testing distribution which is built from Debian Squeeze.For the desktop environment it uses Fluxbox...
  • The Amnesic Incognito Live System - Tails

    Tails is a live system that aims to preserve your privacy and anonymity. It helps you to use the Internet anonymously and circumvent censorship...
  • Penetration Testing Distribution - BlackArch

    BlackArch is a penetration testing distribution based on Arch Linux that provides a large amount of cyber security tools. It is an open-source distro created specially for penetration testers and security researchers...
  • The Best Penetration Testing Distribution - Kali Linux

    Kali Linux is a Debian-based distribution for digital forensics and penetration testing, developed and maintained by Offensive Security. Mati Aharoni and Devon Kearns rewrote BackTrack...
  • Friendly OS designed for Pentesting - ParrotOS

    Parrot Security OS is a cloud friendly operating system designed for Pentesting, Computer Forensic, Reverse engineering, Hacking, Cloud pentesting...

Wednesday, January 6, 2016

Phan - Static Analyzer For PHP


Phan is a static analyzer for PHP.

Getting it running
Phan requires PHP 7+ with the php-ast extension loaded. The code you analyze can be written for any version of PHP.

To get phan running;
  1. Clone the repo
  2. Run composer install to load dependencies
  3. Run ./test to run the test suite
  4. Test phan on itself by running the following
./phan `find src/ -type f -path '*.php'`
If you don't have a version of PHP 7 installed, you can grab a php7dev Vagrant image or one of the many Docker builds out there.
Then compile php-ast . Something along these lines should do it:
git clone https://github.com/nikic/php-ast.git
cd php-ast
phpize
./configure
make install
And add extension=ast.so to your php.ini file. Check that it is there with php -m . If it isn't you probably added it to the wrong php.ini file. Check php --ini to see where it is looking.

Features
  • Checks for calls and instantiations of undeclared functions, methods, closures and classes
  • Checks types of all arguments and return values to/from functions, closures and methods
  • Supports @param , @return , @var and @deprecated phpdoc comments including union and void/null types
  • Checks for Uniform Variable Syntax PHP 5 -> PHP 7 BC breaks
  • Undefined variable tracking
  • Supports namespaces, traits and variadics
  • Generics (from phpdoc hints - int[], string[], UserObject[], etc.)
See the tests directory for some examples of the various checks.

Usage
phan *.php
or give it a text file containing a list of files (but see the next section) to scan:
phan -f filelist.txt
and it might generate output that looks like this:
test1.php:191 UndefError call to undefined function get_real_size()
test1.php:232 UndefError static call to undeclared class core\session\manager
test1.php:386 UndefError Trying to instantiate undeclared class lang_installer
test2.php:4 TypeError arg#1(arg) is object but escapeshellarg() takes string
test2.php:4 TypeError arg#1(msg) is int but logmsg() takes string defined at sth.php:5
test2.php:4 TypeError arg#2(level) is string but logmsg() takes int defined at sth.php:5
test3.php:11 TypeError arg#1(number) is string but number_format() takes float
test3.php:12 TypeError arg#1(string) is int but htmlspecialchars() takes string
test3.php:13 TypeError arg#1(str) is int but md5() takes string
test3.php:14 TypeError arg#1(separator) is int but explode() takes string
test3.php:14 TypeError arg#2(str) is int but explode() takes string
You can see the full list of command line options by running phan -h .

Generating a file list
This static analyzer does not track includes or try to figure out autoloader magic. It treats all the files you throw at it as one big application. For code encapsulated in classes this works well. For code running in the global scope it gets a bit tricky because order matters. If you have an index.php including a file that sets a bunch of global variables and you then try to access those after the include in index.php the static analyzer won't know anything about these.
In practical terms this simply means that you should put your entry points and any files setting things in the global scope at the top of your file list. If you have a config.php that sets global variables that everything else needs put that first in the list followed by your various entry points, then all your library files containing your classes.

Bugs
When you find an issue, please take the time to create a tiny reproducing code snippet that illustrates the bug. And once you have done that, fix it. Then turn your code snippet into a test and add it to tests then ./test and send a PR with your fix and test. Alternatively, you can open an Issue with details.

More on phpdoc types
All the phpdoc types listed on that page should work with one exception. It says that (int|string)[] would indicate an array of ints or strings. phan doesn't support a mixed-type constraint like that. You can say int[]|string[] meaning that the array has to contain either all ints or all strings, but if you have mixed types, just use array .
That means you can do:
<?php
/**
* MyFunc
* @param int $arg1
* @param int|string $arg2
* @param int[]|int $arg3
* @param Datetime|Datetime[] $arg4
* @return array|null
*/
function MyFunc($arg1, $arg2, $arg3, $arg4=null) {
return null;
}
Just like in PHP, any type can be nulled in the function declaration which also means a null is allowed to be passed in for that parameter.
By default, and completely arbitrarily, for things like int[] it checks the first 5 elements. If the first 5 are of the same type, it assumes the rest are as well. If it can't determine the array sub-type it just becomes array which will pass through most type checks. In practical terms, this means that [1,2,'a'] is seen as array but [1,2,3] is int[] and ['a','b','c'] as string[] .

Dealing with dynamic code that confuses the analyzer
There are times when there is just no way for the analyzer to get things right. For example:
<?php
function test() {
$var = 0;
$var = call_some_func_you_cant_hint();
if(is_string($var)) {
$pos = strpos($var, '|');
}
}
Your best option is, of course, to go and add a /** @return string|array */ comment to the call_some_func_you_cant_hint() function, but there are times when that is not an option. As far as the analyzer is concerned, $var is an int because all it sees is the $var = 0; assignment. It will complain about you passing an int to strpos() . You can help it out by adding a @var doc-type comment before the function:
<?php
/**
* @var string|array $var
*/
function test() {
...
This tells the analyzer that along with the int that it figures out on its own, $var can also be a string or an array inside that function. This is a departure from the normal use of the @var tag which is to give properties types, so I don't suggest making a habit of using this hack. But it can be handy to shut up the analyzer without having to refactor the code to not overload the same variable with many different types.

How it works
One of the big changes in PHP 7 is the fact that the parser now uses a real Abstract Syntax Tree ( AST ). This makes it much easier to write code analysis tools by pulling the tree and walking it looking for interesting things.
Phan has 2 passes. On the first pass it reads every file, gets the AST and recursively parses it looking only for functions, methods and classes in order to populate a bunch of global hashes which will hold all of them. It also loads up definitions for all internal functions and classes. The type info for these come from a big file called FunctionSignatureMap.
The real complexity hits you hard in the second pass. Here some things are done recursively depth-first and others not. For example, we catch something like foreach($arr as $k=>$v) because we need to tell the foreach code block that $k and $v exist. For other things we need to recurse as deeply as possible into the tree before unrolling our way back out. For example, for something like c(b(a(1))) we need to call a(1) and check that a() actually takes an int, then get the return type and pass it to b() and check that, before doing the same to c() .
There is a Scope object which keeps track of all variables. It mimics PHP's scope handling in that it has a globals along with entries for each function, method and closure. This is used to detect undefined variables and also type-checked on a return $var .

Quick Mode Explained
In Quick-mode the scanner doesn't rescan a function or a method's code block every time a call is seen. This means that the problem here won't be detected:
<?php
function test($arg):int {
return $arg;
}
test("abc")
This would normally generate:
test.php:3 TypeError return string but `test()` is declared to return int
The initial scan of the function's code block has no type information for $arg . It isn't until we see the call and rescan test()'s code block that we can detect that it is actually returning the passed in string instead of an int as declared.

Running tests
vendor/bin/phpunit


Share:

Domi-Owned - Tool Used for Compromising IBM/Lotus Domino Servers


Domi-Owned is a tool used for compromising IBM/Lotus Domino servers.
Tested on IBM/Lotus Domino 8.5.2, 8.5.3, 9.0.0, and 9.0.1 running on Windows and Linux.

Usage

A valid username and password is not required unless 'names.nsf' and/or 'webadmin.nsf' requires authentication.

Fingerprinting

Running Domi-Owned with just the
--url
flag will attempt to identify the Domino server version, as well as check if 'names.nsf' and 'webadmin.nsf' requires authentication.
If a username and password is given, Domi-Owned will check to see if that account can access 'names.nsf' and 'webadmin.nsf' with those credentials.

Reverse Bruteforce

To perform a Reverse Bruteforce attack against a Domino server, specify a file containing a list of usernames with
-U
, a password with
-p
, and the
--bruteforce
flag. Domi-Owned will then try to authenticate to 'names.nsf', returning successful accounts.

Dump Hashes

To dump all Domino accounts with a non-empty hash from 'names.nsf', run Domi-Owned with the
--hashdump
flag. This prints the results to the screen and writes them to separate out files depending on the hash type (Domino 5, Domino 6, Domino 8).

Quick Console

The Domino Quick Console is active by default; however, it will not show the command's output. A work around to this problem is to redirect the command output to a file, in this case 'log.txt', that is then displayed as a web page on the Domino server.
If the
--quickconsole
flag is given, Domi-Owned will access the Domino Quick Console, through 'webadmin.nsf', allowing the user to issue native Windows or Linux commands. Domi-Owned will then retrieve the output of the command and display the results in real time, through a command line interpreter. Type
exit
to quit the Quick Console interpreter, which will also delete the 'log.txt' output file.

Examples

Fingerprint Domino server

python domi-owned.py --url http://domino-server.com

Preform a reverse bruteforce attack

python domi-owned.py --url http://domino-server.com -U ./usernames.txt -p password --bruteforce

Dump Domino account hashes

python domi-owned.py --url http://domino-server.com -u user -p password --hashdump

Interact with the Domino Quick Console

python domi-owned.py --url http://domino-server.com -u user -p password --quickconsole


Share:

Ares - Python Botnet and Backdoor


Ares is made of two main programs:
  • A Command aNd Control server, which is a Web interface to administer the agents
  • An agent program, which is run on the compromised host, and ensures communication with the CNC
The Web interface can be run on any server running Python. You need to install the cherrypy package.
The client is a Python program meant to be compiled as a win32 executable using pyinstaller. It depends on the requests, pythoncom, pyhook python modules and on PIL (Python Imaging Library).

It currently supports:
  • remote cmd.exe shell
  • persistence
  • file upload/download
  • screenshot
  • key logging

Installation

Server

To install the server, first create the sqlite database:
cd server/
python db_init.py
If no installed, install the cherrypy python package.
Then launch the server by issuing: python server.py
By default, the server listens on http://localhost:8080

Agent

The agent can be launched as a python script, but it is ultimately meant to be compiled as a win32 executable using pyinstaller.

First, install all the dependencies:
  • requests
  • pythoncom
  • pyhook
  • PIL
Then, configure agent/settings.py according to your needs:
SERVER_URL = URL of the CNC http server
BOT_ID = the (unique) name of the bot, leave empty to use hostname
DEBUG = should debug messages be printed to stdout ?
IDLE_TIME = time of inactivity before going in idle mode (the agent checks the CNC for commands far less often when idle).
REQUEST_INTERVAL = interval between each query to the CNC when active
Finally, use pyinstaller to compile the agent into a single exe file:
cd client/
pyinstaller --onefile --noconsole agent.py


Share:

credmap - The Credential Mapper


Credmap is an open source tool that was created to bring awareness to the dangers of credential reuse. It is capable of testing supplied user credentials on several known websites to test if the password has been reused on any of these.

Help Menu

Usage: credmap.py --email EMAIL | --user USER | --load LIST [options]

Options:
-h/--help show this help message and exit
-v/--verbose display extra output information
-u/--username=USER.. set the username to test with
-p/--password=PASS.. set the password to test with
-e/--email=EMAIL set an email to test with
-l/--load=LOAD_FILE load list of credentials in format USER:PASSWORD
-x/--exclude=EXCLUDE exclude sites from testing
-o/--only=ONLY test only listed sites
-s/--safe-urls only test sites that use HTTPS.
-i/--ignore-proxy ignore system default HTTP proxy
--proxy=PROXY set proxy (e.g. "socks5://192.168.1.2:9050")
--list list available sites to test with

Examples

./credmap.py --username janedoe --email janedoe@email.com
./credmap.py -u johndoe -e johndoe@email.com --exclude "github.com, live.com"
./credmap.py -u johndoe -p abc123 -vvv --only "linkedin.com, facebook.com"
./credmap.py -e janedoe@example.com --verbose --proxy "https://127.0.0.1:8080"
./credmap.py --load list.txt
./credmap.py --list


Prerequisites

To get started, you will need Python 2.6+ (previous versions may work as well, however I haven't tested them)
  • Python 2.6+
  • Git (Optional)

Running the program

To run credmap, simply execute the main script "credmap.py".
$ python credmap.py -h

Video


Share:

ATSCAN - Server, Site and Dork Scanner


Description:

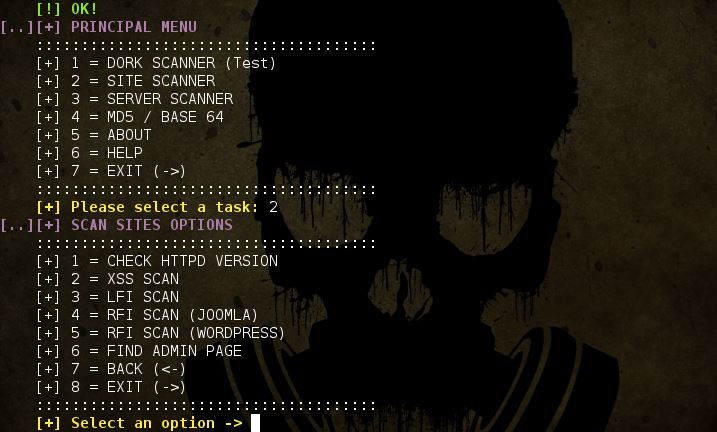
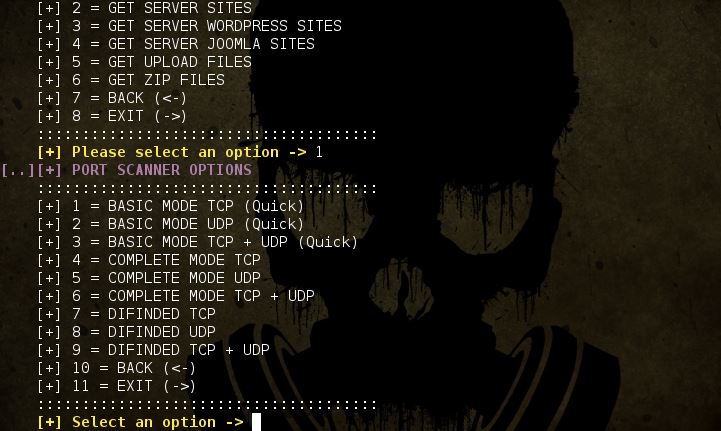
  • ATSCAN Version 2 
  • Dork scanner. 
  • XSS scanner. 
  • Sqlmap. 
  • LFI scanner.
  • Filter wordpress and Joomla sites in the server. 
  • Find Admin page.
  • Decode / Encode MD5 + Base64. 

Libreries to install:

ap-get install libxml-simple-perl
NOTE: Works in linux platforms.

Permissions & Executution:

$chmod +x atscan.pl 
perl ./atscan.pl

Screenshots: 


Share:

Pyersinia - Network Attack Tool


Pyersinia is a similar tool to Yersinia, but Pyersinia is implemented in Python using Scapy. The main objective is the realization of network attacks such as spoofing ARP, DHCP DoS , STP DoS among others. The community can add new attacks on the tool in a simple way, using plugins. This is because Pyersinia uses the STB (Security Tools Builder) framework.

What's new?

Adding new attacks on the tool is a simple task because we use the framework STB (Security Tool Builder). The new attacks are added by plugins.

Installation

Install pyersinia is so easy:
$ python -m pip install pyersinia
Or install from Pypi:
# pip install pyersinia

Quick start

You can display inline help writing:

positional arguments:
arp_spoof_TARGET
arp_spoof_VICTIM

optional arguments:
-h, --help show this help message and exit
-v, --verbosity verbosity level
-a ATTACK_TYPE choose supported attack type
-i IFACE choose network interface

supported attacks:
arp_spoof, dhcp_discover_dos, stp_tcn, stp_conf, stp_root

examples:
python pyersinia.py -a arp_spoof 127.0.0.1 127.0.0.1
python pyersinia.py -a stp_root -i eth0


Share:

Collection Of Awesome Honeypots


A curated list of awesome honeypots, tools, components and much more. The list is divided into categories such as web, services, and others, focusing on open source projects.

Honeypots

  • Database Honeypots
  • Web honeypots
  • Service Honeypots
    • Kippo - Medium interaction SSH honeypot
    • honeyntp - NTP logger/honeypot
    • honeypot-camera - observation camera honeypot
    • troje - a honeypot built around lxc containers. It will run each connection with the service within a seperate lxc container.
    • slipm-honeypot - A simple low-interaction port monitoring honeypot
    • HoneyPy - A low interaction honeypot
    • Ensnare - Easy to deploy Ruby honeypot
    • RDPy - A Microsoft Remote Desktop Protocol (RDP) honeypot in python
  • Anti-honeypot stuff
    • kippo_detect - This is not a honeypot, but it detects kippo. (This guy has lots of more interesting stuff)
  • ICS/SCADA honeypots
    • Conpot - ICS/SCADA honeypot
    • scada-honeynet - mimics many of the services from a popular PLC and better helps SCADA researchers understand potential risks of exposed control system devices
    • SCADA honeynet - Building Honeypots for Industrial Networks
  • Deployment
  • Data Analysis
    • Kippo-Graph - a full featured script to visualize statistics from a Kippo SSH honeypot
    • Kippo stats - Mojolicious app to display statistics for your kippo SSH honeypot
  • Other/random
    • NOVA uses honeypots as detectors, looks like a complete system.
    • Open Canary - A low interaction honeypot intended to be run on internal networks.
    • libemu - Shellcode emulation library, useful for shellcode detection.
  • Open Relay Spam Honeypot
  • Botnet C2 monitor
    • Hale - Botnet command & control monitor
  • IPv6 attack detection tool
    • ipv6-attack-detector - Google Summer of Code 2012 project, supported by The Honeynet Project organization
  • Research Paper
    • vEYE - behavioral footprinting for self-propagating worm detection and profiling
  • Honeynet statistics
    • HoneyStats - A statistical view of the recorded activity on a Honeynet
  • Dynamic code instrumentation toolkit
    • Frida - Inject JavaScript to explore native apps on Windows, Mac, Linux, iOS and Android
  • Front-end for dionaea
    • DionaeaFR - Front Web to Dionaea low-interaction honeypot
  • Tool to convert website to server honeypots
    • HIHAT - ransform arbitrary PHP applications into web-based high-interaction Honeypots
  • Malware collector
    • Kippo-Malware - Python script that will download all malicious files stored as URLs in a Kippo SSH honeypot database
  • Sebek in QEMU
    • Qebek - QEMU based Sebek. As Sebek, it is data capture tool for high interaction honeypot
  • Malware Simulator
    • imalse - Integrated MALware Simulator and Emulator
  • Distributed sensor deployment
    • Smarthoneypot - custom honeypot intelligence system that is simple to deploy and easy to manage
    • Modern Honey Network - Multi-snort and honeypot sensor management, uses a network of VMs, small footprint SNORT installations, stealthy dionaeas, and a centralized server for management
    • ADHD - Active Defense Harbinger Distribution (ADHD) is a Linux distro based on Ubuntu LTS. It comes with many tools aimed at active defense preinstalled and configured
  • Network Analysis Tool
  • Log anonymizer
    • LogAnon - log anonymization library that helps having anonymous logs consistent between logs and network captures
  • server
    • Honeysink - open source network sinkhole that provides a mechanism for detection and prevention of malicious traffic on a given network
  • Botnet traffic detection
    • dnsMole - analyse dns traffic, and to potentionaly detect botnet C&C server and infected hosts
  • Low interaction honeypot (router back door)
  • honeynet farm traffic redirector
    • Honeymole - eploy multiple sensors that redirect traffic to a centralized collection of honeypots
  • HTTPS Proxy
    • mitmproxy - allows traffic flows to be intercepted, inspected, modified and replayed
  • spamtrap
  • System instrumentation
    • Sysdig - open source, system-level exploration: capture system state and activity from a running Linux instance, then save, filter and analyze
  • Honeypot for USB-spreading malware
    • Ghost-usb - honeypot for malware that propagates via USB storage devices
  • Data Collection
    • Kippo2MySQL - extracts some very basic stats from Kippo’s text-based log files (a mess to analyze!) and inserts them in a MySQL database
    • Kippo2ElasticSearch - Python script to transfer data from a Kippo SSH honeypot MySQL database to an ElasticSearch instance (server or cluster)
  • Passive network audit framework parser
    • pnaf - Passive Network Audit Framework
  • VM Introspection
    • VIX virtual machine introspection toolkit - VMI toolkit for Xen, called Virtual Introspection for Xen (VIX)
    • vmscope - Monitoring of VM-based High-Interaction Honeypots
    • vmitools - C library with Python bindings that makes it easy to monitor the low-level details of a running virtual machine
  • Binary debugger
  • Mobile Analysis Tool
    • APKinspector - APKinspector is a powerful GUI tool for analysts to analyze the Android applications
    • Androguard - Reverse engineering, Malware and goodware analysis of Android applications ... and more
  • Low interaction honeypot
    • Honeypoint - platform of distributed honeypot technologies
    • Honeyperl - Honeypot software based in Perl with plugins developed for many functions like : wingates, telnet, squid, smtp, etc
  • Honeynet data fusion
    • HFlow2 - data coalesing tool for honeynet/network analysis
  • Server
    • LaBrea - takes over unused IP addresses, and creates virtual servers that are attractive to worms, hackers, and other denizens of the Internet.
    • Kippo - SSH honeypot
    • KFSensor - Windows based honeypot Intrusion Detection System (IDS)
    • Honeyd Also see more honeyd tools
    • Glastopf - Honeypot which emulates thousands of vulnerabilities to gather data from attacks targeting web applications
    • DNS Honeypot - Simple UDP honeypot scripts
    • Conpot - ow interactive server side Industrial Control Systems honeypot
    • Bifrozt - High interaction honeypot solution for Linux based systems
    • Beeswarm - Honeypot deployment made easy
    • Bait and Switch - redirects all hostile traffic to a honeypot that is partially mirroring your production system
    • Artillery - open-source blue team tool designed to protect Linux and Windows operating systems through multiple methods
    • Amun - vulnerability emulation honeypot
  • VM cloaking script
    • Antivmdetect - Script to create templates to use with VirtualBox to make vm detection harder
  • IDS signature generation
  • lookup service for AS-numbers and prefixes
  • Web interface (for Thug)
    • Rumal - Thug's Rumāl: a Thug's dress & weapon
  • Data Collection / Data Sharing
    • HPfriends - data-sharing platform
    • HPFeeds - lightweight authenticated publish-subscribe protocol
  • Distributed spam tracking
  • Python bindings for libemu
  • Controlled-relay spam honeypot
  • Visualization Tool
  • central management tool
  • Network connection analyzer
  • Virtual Machine Cloaking
  • Honeypot deployment
  • Automated malware analysis system
  • Low interaction
  • Low interaction honeypot on USB stick
  • Honeypot extensions to Wireshark
  • Data Analysis Tool
  • Telephony honeypot
  • Client
  • Visual analysis for network traffic
  • Binary Management and Analysis Framework
  • Honeypot
  • PDF document inspector
  • Distribution system
  • HoneyClient Management
  • Network Analysis
  • Hybrid low/high interaction honeypot
  • Sebek on Xen
  • SSH Honeypot
  • Glastopf data analysis
  • Distributed sensor project
  • a pcap analyzer
  • Client Web crawler
  • network traffic redirector
  • Honeypot Distribution with mixed content
  • Honeypot sensor
  • File carving
  • File and Network Threat Intelligence
  • data capture
  • SSH proxy
  • Anti-Cheat
  • behavioral analysis tool for win32
  • Live CD
  • Spamtrap
  • Commercial honeynet
  • Server (Bluetooth)
  • Dynamic analysis of Android apps
  • Dockerized Low Interaction packaging
  • Network analysis
  • Sebek data visualization
  • SIP Server
  • Botnet C2 monitoring
  • low interaction
  • Malware collection

Honeyd Tools

Network and Artifact Analysis

  • Sandbox
  • Sandbox-as-a-Service
    • malwr.com - free malware analysis service and community
    • detux.org - Multiplatform Linux Sandbox
    • Joebox Cloud - analyzes the behavior of malicious files including PEs, PDFs, DOCs, PPTs, XLSs, APKs, URLs and MachOs on Windows, Android and Mac OS X for suspicious activities

Data Tools

  • Front Ends
    • Tango - Honeypot Intelligence with Splunk
    • Django-kippo - Django App for kippo SSH Honeypot
    • Wordpot-Frontend - a full featured script to visualize statistics from a Wordpot honeypot -Shockpot-Frontend - a full featured script to visualize statistics from a Shockpot honeypot
  • Visualization
    • HoneyMap - Real-time websocket stream of GPS events on a fancy SVG world map
    • HoneyMalt - Maltego tranforms for mapping Honeypot systems

Share:

Flashlight - Automated Information Gathering Tool for Penetration Testers


Pentesters spend too much time during information gathering phase. Flashlight (Fener) provides services to scan network/ports and gather information rapidly on target networks. So Flashlight should be the choice to automate discovery step during a penetration test. In this article, usage of Flashligh application will be explained.

For more information about using Flashlight, "-h" or "-help" option can be used.

Parameters for the usage of this application can be listed below

  • -h, --help: It shows the information about using the Flashlight application.
  • -p <ProjectName> or --project < ProjectName>: It sets project name with the name given. This paramater can be used to save different projects in different workspaces.
  • -s <ScanType> or –scan_type < ScanType >: It sets the type of scans. There are four types of scans: Active Scan , Passive Scan, Screenshot Scan and Filtering. These types of scans will be examined later in detail.
  • -d < DestinationNetwork>, --destination < DestinationNetwork >: It sets the network or IP where the scan will be executed against.
  • -c <FileName>, --config <FileName>: It specifies the configuration file. The scanning is realized according to the information in the configuration file.
  • -u <NetworkInterface>, --interface < NetworkInterface>: It sets the network interface used during passive scanning.
  • -f <PcapFile>, --pcap_file < PcapFile >: It sets cap File that will be filtered.
  • -r <RasterizeFile>, --rasterize < RasterizeFile>: It sets the specific location of Rasterize JavaScript file which will be used for taking screenshots.
  • -t <ThreadNumber>, --thread <Threadnember>: It sets the number of Threads. This parameter is valid only on screenshot scanning (screen scan) mode.
  • -o <OutputDiectory>, --output < OutputDiectory >: It sets the directory in which the scan results can be saved. The scan results are saved in 3 sub-directories : For Nmap scanning results, "nmap" subdirectory, for PCAP files "pcap" subdirectory and for screenshots "screen" subdirectories are used. Scan results are saved in directory, shown under the output directories by this parameter. If this option is not set, scan results are saved in the directory that Flashlight applications are running.
  • -a, --alive: It performs ping scan to
  • “-I” parameter is chosen.
  • -l <LogFile>, --log < LogFile >: It specifies the log file to save the scan results. If not set, logs are saved in “flashlight.log” file in working directory.
  • -k <PassiveTimeout>, --passive_timeout <PassiveTimeout>: It specifies the timeout for sniffing in passive mode. Default value is 15 seconds. This parameter is used for passive scan.
  • -m, --mim: It is used to perform MITM attack.
  • -n, --nmap-optimize: It is used to optimize nmap scan.
  • -v, --verbose: It is used to list detailed information.
  • -V, --version: It specifies version of the program. 
  •  discover up IP addresses before the actual vulnerability scan. It is used for active scan.
  • -g <DefaultGateway>, --gateway < DefaultGateway >: It identifies the IP address of the gateway. If not set, interface with “-I” parameter is chosen.
  • -l <LogFile>, --log < LogFile >: It specifies the log file to save the scan results. If not set, logs are saved in “flashlight.log” file in working directory.
  • -k <PassiveTimeout>, --passive_timeout <PassiveTimeout>: It specifies the timeout for sniffing in passive mode. Default value is 15 seconds. This parameter is used for passive scan.
  • -m, --mim: It is used to perform MITM attack.
  • -n, --nmap-optimize: It is used to optimize nmap scan.
  • -v, --verbose: It is used to list detailed information.
  • -V, --version: It specifies version of the program. 

Installation

apt-get install nmap tshark tcpdump dsniff
In order to install phantomjs easily, you can download and extract it from https://bitbucket.org/ariya/phantomjs/downloads.
Flashlight application can perform 3 basic scan types and 1 analysis type. Each of them are listed below.

1) Passive Scan

In passive scan, no packets are sent into wire. This type of scan is used for listening network and analyzing packets.
To launch a passive scan by using Flashlight; a project name should be specified like “passive-pro-01”. In the following command, packets that are captured by eth0 are saved into “/root/Desktop/flashlight/output/passive-project-01/pcap" directory, whereas, Pcap files and all logs are saved into "/root/Desktop/log" directory.

./flashlight.py -s passive -p passive-pro-01 -i eth0 -o /root/Desktop/flashlight_test -l /root/Desktop/log –v

2) Active Scan

During an active scan, NMAP scripts are used by reading the configuration file. An example configuration file (flashlight.yaml) is stored in “config” directory under the working directory.
tcp_ports:
   - 21, 22, 23, 25, 80, 443, 445, 3128, 8080
udp_ports:
   - 53, 161
scripts:
   - http-enum

According to "flashlight.yaml" configuration file, the scan executes against "21, 22, 23, 25, 80, 443, 445, 3128, 8080" TCP ports, "53, 161" UDP ports, "http-enum" script by using NMAP.

Note: During active scan “screen_ports” option is useless. This option just works with screen scan.
“-a” option is useful to discover up hosts by sending ICMP packets. Beside this, incrementing thread number by using “-t” parameter increases scan speed.

./flashlight.py -p active-project -s active -d 192.168.74.0/24 –t 30 -a -v

By running this command; output files in three different formats (Normal, XML and Grepable) are emitted for four different scan types (Operating system scan, Ping scan, Port scan and Script Scan).

The example commands that Flashlight Application runs can be given like so:

  • Operating System Scan: /usr/bin/nmap -n -Pn -O -T5 -iL /tmp/"IPListFile" -oA /root/Desktop/flashlight/output/active-project/nmap/OsScan-"Date"
  • Ping Scan: /usr/bin/nmap -n -sn -T5 -iL /tmp/"IPListFile" -oA /root/Desktop/flashlight/output/active-project/nmap/PingScan-"Date"
  • Port Scan: /usr/bin/nmap -n -Pn -T5 --open -iL /tmp/"IPListFile" -sS -p T:21,22,23,25,80,443,445,3128,8080,U:53,161 -sU -oA /root/Desktop/flashlight/output/active-project/nmap/PortScan-"Date"
  • Script Scan: /usr/bin/nmap -n -Pn -T5 -iL /tmp/"IPListFile" -sS -p T:21,22,23,25,80,443,445,3128,8080,U:53,161 -sU --script=default,http-enum -oA /root/Desktop/flashlight/output/active-project/nmap/ScriptScan-"Date" 

 3) Screen Scan

Screen Scan is used to get screenshots of web sites/applications by using directives in config file (flashlight.yaml). Directives in this file provide screen scan for four ports ("80, 443, 8080, 8443") screen_ports: - 80, 443, 8080, 8443 Sample screen scan can be performed like this: ``` ./flashlight.py -p project -s screen -d 192.168.74.0/24 -r /usr/local/rasterize.js -t 10 -v ```

4) Filtering

Filtering option is used to analyse pcap files. An example for this option is shown below: ``` ./flashlight.py -p filter-project -s filter -f /root/Desktop/flashlight/output/passive-project-02/pcap/20150815072543.pcap -v ``` By running this command some files are created on “filter” sub-folder. This option analyzes PCAP packets according to below properties:
  • Windows hosts
  • Top 10 DNS requests

Share:

Mosca - Static Analysis Tool To Find Bugs


Just another Simple static analysis tool to find bugs like a grep unix command, at mosca have a modules, that was call egg, each egg is a simple config to find bug at especific language like PHP,Ruby,ASP etc... Example of egg config at directory "egg", If Mosca read a line with vunerability of egg in source code, then, mosca have alert about vulnerability and save at logs.


Share:
Established in 2015. Offensive Sec Blog has been sharing security research, hacking tools, threat intelligence, and offensive security content since 2015.
Copyright © OffSec Blog | Powered by OffensiveSec
Design by OffSec | Built for the security community