SECURITY EDUCATION, PRIVACY GUIDANCE, THREAT AWARENESS, OPEN SOURCE TOOLS, RESEARCH NOTES, AND RESPONSIBLE TECHNOLOGY CONTENT

  • Penetration Testing Distribution - BackBox

    BackBox is a penetration test and security assessment oriented Ubuntu-based Linux distribution providing a network and informatic systems analysis toolkit. It includes a complete set of tools required for ethical hacking and security testing...
  • Pentest Distro Linux - Weakerth4n

    Weakerth4n is a penetration testing distribution which is built from Debian Squeeze.For the desktop environment it uses Fluxbox...
  • The Amnesic Incognito Live System - Tails

    Tails is a live system that aims to preserve your privacy and anonymity. It helps you to use the Internet anonymously and circumvent censorship...
  • Penetration Testing Distribution - BlackArch

    BlackArch is a penetration testing distribution based on Arch Linux that provides a large amount of cyber security tools. It is an open-source distro created specially for penetration testers and security researchers...
  • The Best Penetration Testing Distribution - Kali Linux

    Kali Linux is a Debian-based distribution for digital forensics and penetration testing, developed and maintained by Offensive Security. Mati Aharoni and Devon Kearns rewrote BackTrack...
  • Friendly OS designed for Pentesting - ParrotOS

    Parrot Security OS is a cloud friendly operating system designed for Pentesting, Computer Forensic, Reverse engineering, Hacking, Cloud pentesting...

Tuesday, January 19, 2016

SIP Witch


SIP Witch


GNU SIP Witch is a secure peer-to-peer VoIP server that uses the SIP protocol. Calls can be made peer-to-peer behind NAT firewalls, and without needing a service provider. GNU SIP Witch supports using secure telephone extensions, for placing and receiving calls directly over the Internet, and intercept-free peer-to-peer audio and video extensions. GNU SIP Witch also is being introduced as a desktop VoIP mediation service to enable the construction of participatory bottom-up secure calling networks and to enable replacement of Skype with free software and published protocols. As a desktop mediation service, GNU SIP Witch can solve issues like NAT in one place for all user agents, and offer new ways to route and redirect VoIP much like gstreamer does for desktop media.

GNU Bayonne is the telephony server of GNU Telephony and the GNU Project. The production release of GNU Bayonne 1 is 1.2.15 and has a long history in production telecommunication environments. GNU Bayonne supports IVR scripting using hardware from Voicetronix, Dialogic, Aculab, CAPI drivers, and Quicklink drivers under GNU/Linux. GNU Bayonne 1 can integrate perl and python applications, and has been commercially deployed in production use for several years. Future releases of GNU Bayonne will be based on ucommon and will further explore it’s role as a Telephony integration server.

GNU SIP Witch is a call and registration server for the SIP protocol. As a call server it services call registration for SIP devices and destination routing through SIP gateways. GNU SIP Witch does not perform codec operations or media proxying and thereby enables SIP endpoints to directly peer negotiate call setting and process peer to peer media streaming even when when multiple SIP Witch call nodes at multiple locations are involved. This means GNU SIP Witch operates without introducing additional media latency or offering a central point for media capture.

GNU SIP Witch is designed to support network scaling of telephony services, rather than the heavily compute-bound solutions we find in use today. This means a call node has a local authentication/registration database, and this will be mirrored, so that any active call node in a cluster will be able to accept and service a call. This allows for the possibility of live failover support in the future as well.

GNU SIP Witch is not a SIP “router”, and does not try to address the same things as a project like iptel “Ser”. GNU SIP Witch is being designed to create on-premise SIP telephone systems, telecenter servers, and Internet hosted SIP telephone systems. One important feature will include use of URI routing to support direct peer to peer calls between service domains over the public internet without needing mediation of an intermediary “service provider” so that people can publish and call sip: uri’s unconstrained. GNU SIP Witch is about freedom to communicate and the removal of artifical barriers and constraints whether imposed by monopoly service providers or by governments.


Share:

Injecting Fake Updates - Evilgrade


Evilgrade is a modular framework that allows the user to take advantage of poor upgrade implementations by injecting fake updates. It comes with pre-made binaries (agents), a working default configuration for fast pentests, and has it’s own WebServer and DNSServer modules. Easy to set up new settings, and has an autoconfiguration when new binary agents are set.


When should I use evilgrade?

This framework comes into play when the attacker is able to make hostname redirections (manipulation of victim’s dns traffic), and such thing can be done on 2 scenarios:

Injecting Fake Updates: Evilgrade

ºInternal DNS access
ºARP spoofing
ºDNS Cache Poisoning
ºDHCP spoofing
ºTCP hijacking
ºWi-Fi Access Point impersonation


External scenery:

ºInternal DNS access
ºDNS Cache Poisoning


How does it work?

Evilgrade works with modules, in each module there’s an implemented structure which is needed to emulate a fake update for an specific application/system.


What OS are supported?

ISR-Evilgrade is crossplatform, it only depends of having an appropriate payload for the right target platform to be exploited.


Implemented modules:

ºFreerip 3.30
ºJet photo 4.7.2
ºTeamviewer 5.1.9385
ºISOpen 4.5.0
ºIstat.
ºGom 2.1.25.5015
ºAtube catcher 1.0.300
ºVidbox 7.5
ºCcleaner 2.30.1130
ºFcleaner 1.2.9.409
ºAllmynotes 1.26
ºNotepad++ 5.8.2
ºJava 1.6.0_22 winxp/win7
ºaMSN 0.98.3
ºAppleupdate <= 2.1.1.116 ( Safari 5.0.2 7533.18.5, <= Itunes 10.0.1.22, <= Quicktime 7.6.8 1675)
ºMirc 7.14
ºWindows update (ie6 lastversion, ie7 7.0.5730.13, ie8 8.0.60001.18702, Microsoft works)
ºDap 9.5.0.3
ºWinscp 4.2.9
ºAutoIt Script 3.3.6.1
ºClamwin 0.96.0.1
ºAppTapp Installer 3.11 (Iphone/Itunes)
getjar (facebook.com)
ºGoogle Analytics Javascript injection
ºSpeedbit Optimizer 3.0 / Video Acceleration 2.2.1.8
ºWinamp 5.581
ºTechTracker (cnet) 1.3.1 (Build 55)
ºNokiasoftware firmware update 2.4.8es – (Windows software)
ºNokia firmware v20.2.011
ºBSplayer 2.53.1034
ºApt ( < Ubuntu 10.04 LTS)
ºUbertwitter 4.6 (0.971)
ºBlackberry Facebook 1.7.0.22 | Twitter 1.0.0.45
ºCpan 1.9402
ºVirtualBox (3.2.8 )
ºExpress talk
ºFilezilla
ºFlashget
ºMiranda
ºOrbit
ºPhotoscape.
ºPanda Antirootkit
ºSkype
ºSunbelt
ºSuperantispyware
ºTrillian <= 5.0.0.26
ºAdium 1.3.10 (Sparkle Framework)
ºVMware
ºmore…
º/docs/CHANGES

Share:

Tiny Core Linux


Tiny Core Linux is a light and modular Linux distribution. Its main purpose is to allow the easy construction of simple but powerful appliance-like desktops.

Contemplating a distribution that can get you to a basic, empty desktop by booting from a 10MB ISO (you read that right), you’d be forgiven for wondering how comprehensive a Tiny Core system could be. On further investigation it turns out that Tiny Core owes its slim stature to a careful choice of lightweight components and the fact that it isn’t derived from one of the mainstream distributions. This decision by the developers brings with it both advantages and disadvantages. Tiny Core offers a very fast experience overall, with a boot time that none of the major distributions can touch. On the other hand, if something goes wrong or you couldn’t find a runnable application that you needed, the remedies that work on other Linux systems may not work with Tiny Core.

Once up and running, you are plonked into a blue desktop courtesy of the FLWM window manager with an icon-based application launcher at the bottom of the screen. By default, there are icons to access settings, add packages to the system, mount disks and to launch the file manager, but there are no substantial applications at this point.


Tiny Core uses its own package format, but rest assured, the package repository is huge with thousands of applications that are ready to go. Adding a medium-sized application such as Firefox, for example, takes only a couple of minutes. When you install applications, using the GUI package manager, they are downloaded and then added on the fly, automatically popping up on the application bar.  During the boot process, the user specifies the location of a directory to be used for settings and application packages, and on subsequent boots, Tiny Core automatically locates the files that it needs. Here again, we glimpse some intriguing technology as there are options for loading the application files into RAM or fetching them from the disk when needed


Tiny Core Linux


There are a few ways of using Tiny Core, but the approach favoured by the developers is to combine a medium such as a CDROM with writable storage such as a hard disk or USB stick. The developers cite the advantage that this makes system files incorruptible, but the problem is that I don’t think that many people will want to boot from a CDROM every time they switch the computer on. Neither will many people be interested in carrying around a CDROM and a USB stick in order to get the system working. Compounding the awkwardness of this approach, Tiny Core doesn’t support NTFS partitions for the user files folder.

A USB pen drive installation is a good compromise, and an automated script for carrying this out does exist. The script isn’t very flexible, however, and it wipes the entire drive, setting up separate partitions for the system files and user data and applications respectively.


The least well supported approach is to boot from the hard disk, and yet I suspect that this would be the most popular amongst potential users. It can be done, but the installation is far from automated and involves manual partitioning, formatting, file copying and setting up of GRUB. Bafflingly, the developers indicate, on the Tiny Core website, that they don’t see the demand for hard disk installation.


Share:

MD5 Online Password Cracking - md5cracker


MD5 Online Password Cracking: md5cracker

md5cracker.sh is a shell script that connects to various online resources to gather hash corresponding to a provided MD5 string


Installation

$ cd /usr/local/bin/
$ sudo wget http://packetstormsecurity.org/Crackers/md5cracker.sh.txt
$ sudo mv md5cracker.sh.txt md5cracker
$ sudo chmod +x md5cracker


Usage

$ md5cracker 8d3533d75ae2c3966d7e0d4fcc69216b


=> Md5 Online Cracker
=> FuRt3X ~> blkhtc0rp@yahoo.com.br


[*] www.md5crack.com: charley
[*] md5.hashcracking:   charley
[*] md5hood.com: charley
[*] md5.gromweb.com:   charley
[*] md5-db.de:  charley
[*] md5.thekaine.de:  OCTYPE HTML PUBLIC "-//IETF//DTD HTML 2.0//EN">404 Not FoundNot FoundThe requested URL /decode_multi.php was not found on this server.
[*] passcracking.com:  charley
[*] md5-decrypter.com:   charley
[*] www.bigtrapeze.com:  charley


Share:

Writing Your Own Exploits


Writing Your Own Exploits

How to find vulnerabilities, write shellcode, exploit the vulnerability and finally turn it into a Metasploit exploit module! David Hoelzer is a Senior Fellow with the SANS Institute and author of the SANS Secure Coding in C/C++ course. TnX


Exploits – Part 1 – Exploit Creation in metasploit (intro)


Exploits – Part 2 – 1 – Finding Flaws (part one and two)


Exploits – Part 2 – 2 


Exploits – Part 3 – 1 – Writing Shellcode (part one and two)


Exploits – Part 4 – 1 – Conversion to metasploit (part one and two)


Share:

Encrypt Your Network Traffic - Tcpcrypt


Tcpcrypt is a protocol that attempts to encrypt (almost) all of your network traffic. Unlike other security mechanisms, Tcpcrypt works out of the box: it requires no configuration, no changes to applications, and your network connections will continue to work even if the remote end does not support Tcpcrypt, in which case connections will gracefully fall back to standard clear-text TCP. Install Tcpcrypt and you’ll feel no difference in your every day user experience, but yet your traffic will be more secure and you’ll have made life much harder for hackers.

So why is now the right time to turn on encryption? Here are some reasons: 

ºIntercepting communications today is simpler than ever because of wireless networks. Ask a hacker how many e-mail passwords can be intercepted at an airport by just using a wifi-enabled laptop. This unsophisticated attack is in reach of many. The times when only a few elite had the necessary skill to eavesdrop are gone.

ºComputers have now become fast enough to encrypt all Internet traffic. New computers come with special hardware crypto instructions that allow encrypted networking speeds of 10Gbit/s. How many of us even achieve those speeds on the Internet or would want to download (and watch) one movie per second? Clearly, we can encrypt fast enough.

ºResearch advances and the lessons learnt from over 10 years of experience with the web finally enabled us to design a protocol that can be used in today’s Internet, by today’s users. Our protocol is pragmatic: it requires no changes to applications, it works with NATs (i.e., compatible with your DSL router), and will work even if the other end has not yet upgraded to tcpcrypt—in which case it will gracefully fall back to using the old plain-text TCP. No user configuration is required, making it accessible to lay users—no more obscure requests like “Please generate a 2048-bit RSA-3 key and a certificate request for signing by a CA”. Tcpcrypt can be incrementally deployed today, and with time the whole Internet will become encrypted.


How Tcpcrypt works

Tcpcrypt is opportunistic encryption. If the other end speaks Tcpcrypt, then your traffic will be encrypted; otherwise it will be in clear text. Thus, Tcpcrypt alone provides no guarantees—it is best effort. If, however, a Tcpcrypt connection is successful and any attackers that exist are passive, then Tcpcrypt guarantees privacy.

Network attackers come in two varieties: passive and active (man-in-the-middle). Passive attacks are much simpler to execute because they just require listening on the network. Active attacks are much harder as they require listening and modifying network traffic, often requiring very precise timing that can make some attacks impractical.

By default Tcpcrypt is vulnerable to active attacks—an attacker can, for example, modify a server’s response to say that Tcpcrypt is not supported (when in fact it is) so that all subsequent traffic will be clear text and can thus be eavesdropped on.

Tcpcrypt, however, is powerful enough to stop active attacks, too, if the application using it performs authentication. For example, if you log in to online banking using a password and the connection is over Tcpcrypt, it is possible to use that shared secret between you and the bank (i.e., the password) to authenticate that you are actually speaking to the bank and not some active (man-in-the-middle) attacker. The attacker cannot spoof authentication as it lacks the password. Thus, by default, Tcpcrypt will try its best to protect your traffic. Applications requiring stricter guarantees can get them by authenticating a Tcpcrypt session.


Installing tcpcrypt

$ git clone git://github.com/scslab/tcpcrypt.git
$ cd tcpcrypt
$ ./bootstrap.sh
$ ./configure
$ make
$ sudo ./launch_tcpcryptd.sh


The launch script starts tcpcryptd and adds firewall rules to divert all TCP traffic — except that which is already encrypted, like SSH — to tcpcryptd. When the script exits (on Ctrl-C or kill), it restores your firewall config to its former state — no permanent changes are made.

On Linux, you must first install libnfnetlink, libnetfilter_queue, and libcap.

Optional: running make install will install libtcpcrypt and tcpcrypt headers, for building apps that use tcpcrypt’s session ID.


Try it out

Go to http://tcpcrypt.org/test.php with tcpcryptd running. If tcpcrypt is working, you’ll be able to join the tcpcrypt Hall of Fame and your tcpcrypt session ID will be displayed at the bottom of the page.

Now let’s examine the packets going over the wire by starting tcpdump and then reloading the URL above.

sudo tcpdump -X -s0 host tcpcrypt.org

Compare this tcpdump output, which appears encrypted (or at least unreadable), with the cleartext packets you would see without tcpcryptd running.

A final netcat example:

$ sudo ./launch_tcpcryptd.sh & 
$ nc -l 7777 &
$ sudo tcpdump -i lo -n -s0 -vvvv -X tcp port 7777 &
$ echo hello, world! | nc localhost 7777
# clean up
$ sudo killall tcpcryptd tcpdump


Troubleshooting

If it’s not working, the most likely causes are the following.

ºYour browser already had an open, non-tcpcrypted TCP connection to tcpcrypt.org before you ran the launch script. Quit and reopen your browser, wait 30 seconds, or use a different browser to retrieve the tcpcrypt.org URL.

ºThere’s a conflict with your existing firewall rules. See the firewall setup section in the install guide for your platform.


Share:

Passive Network Monitoring - lanmap2


lanmap2 is a passive network monitoring/analysis framework; no SNMP required.

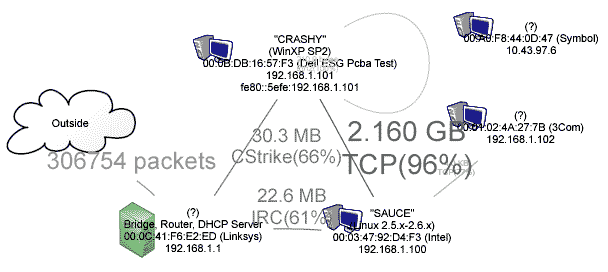
It promiscuously listens to all passing data and sifts out potentially interesting factoids (addresses, names, fingerprints, unusual situations, etc.) into an sqlite database. scripts are provided to query the database and generate image graphs of network entities, overall connectivity, traffic and notable applications, operating systems and roles that systems play.

It is meant to be an extensible framework; anyone who spends time looking at network traffic and knows a little SQL should be able to contribute analysis-type ‘mappings’ (see data/*.sql) lanmap2’s components are decoupled from each other and are fairly straight-forward and flexible; you can report things to the database without having to use them and you can work on analysis-type tasks or scripts while network capture is running.

The current graphing scripts use php to query the database and generate input to graphviz; these can be modified fairly easily.


lanmap Installation

Everything is pretty much manual at this point


Passive Network Monitoring Dependencies:

ºsqlite3 and libsqlite3 (sqlite2 not acceptable!)
ºlibpcap
ºgcc
ºphp (to interface with db and generate graphviz input; plan on replacing with lua)
ºgraphviz (for graph generating)

sudo apt-get install libpcap-dev libsqlite3-dev gcc graphviz php5-cli php5-sqlite sqlite3

Run make

make

This will build and populate the database file ‘db/db’

And the parse/capture program ‘src/cap’


lanmap2 Use

1. Start capturing

cd db && sudo ../src/cap && cd -

The application has to run as root, which is a potential security hazard.

This currently produces prodigious amounts of output; sue me.

2. Generate a graph after letting the capture run for a while.

cd graph && ./graph.sh && cd -

This will generate a graph at graph/net.png

This runs a bunch of php scripts.

3. View the graph via the web/ crap


I suggest you map/symlink apache to the web/ directory if you are capable


Share:

Monday, January 18, 2016

Wireless and Wired Network Interceptor - the Interceptor


The Interceptor is a wireless wired network tap. Basically, a network tap is a way to listen in to network traffic as it flows past. I haven’t done extensive research but all the ones I found when looking passed the copy of the traffic onto a specified wired interface which was then plugged into a machine to allow a user to monitor the traffic. The problem with this is that you have to be able to route the data from that wired port to your monitoring machine either through a direct cable or through an existing network. The direct cable method means your monitor has to be near by the location you want to tap, the network routing means you have to somehow encapsulate the data to get it across the network without it being affected on route.

The Interceptor does away with the wired monitor port and instead spits out the traffic over wireless meaning the listener can be anywhere they can make a wireless connection to the device. As the data is encrypted (actually, double encrypted, see how it works) the person placing the tap doesn’t have to worry about unauthorized users seeing the traffic.


What Hardware Is Required


This project has been built and tested on a Fon+ but should in theory work on any device which will run OpenWrt and has at least a pair of wired interfaces and a wireless one.


Wireless and Wired Network Interceptor: the Interceptor


This isn’t intended to be a permanent, in-situ device. It is designed for short term trouble shooting or information gathering on low usage networks, as such, it will work well between a printer and a switch but not between a switch and a router. Here are some possible situations for use:

ºPenetration testing – If you can gain physical access to a targets office drop the device between the office printer and switch then sit in the carpark and collect a copy of all documents printed. Or, get an appointment to see a boss and when he leaves the room to get you a drink, drop it on his computer. The relative low cost of the Fon+ means the device can almost be considered disposable and if branded with the right stickers most users wouldn’t think about an extra small box on the network.

ºTroubleshooting – For sys-admins who want to monitor an area of network from the comfort of their desks, just put it in place and fire up your wireless.


ºIDS – If you want to see what traffic is being generated from a PC without interfering with the PC simply add the Interceptor and sit back and watch. As the traffic is cloned to a virtual interface on your monitoring machine you can use any existing tools to scan the data.


Install Notes

There are two sets of install notes, a basic set and a detailed walk-through set. The basic set is the standard set of notes that comes with most packages, the detailed set is a full walk through from flashing the Fon+, installing dependencies, installing Interceptor, starting up and monitoring traffic and finally shutting it down. Most people should find the basic set sufficient but the detailed set are useful if you have any problems.


Limitations

Wireless and Wired Network InterceptorThe main limitation is bandwidth, the wired network can get up to 100Mb/s but the top speed of the wireless is 54Mb/s, add on to that the overhead of encryption and that rate drops down further. This is why the Interceptor won’t work well on high traffic parts of the network.

From tests I’ve done, under high load the network seems to stay up and stable but not all traffic ends up on the monitor interface. I haven’t done any research to find out where the traffic is being dropped, it could be DaemonLogger, the AP or at the VPN. This is good as it means the device doesn’t affect the smooth running of the network but obviously means you may miss some important data. Be aware of this when working with the device.

The software has no fail safe in case of problems. If the hardware or software fails the network connection being tapped will probably be lost. Don’t use the Interceptor in situations where uptime is critical without knowing what you are doing.


Share:

Encrypted UDP based FTP - UFTP


Encrypted UDP based FTP with multicast

UPDATE: Version 4 of UFTP is now available! The protocol has been heavily altered to support a number of new features:

ºThe ability to send multiple files in a single session
ºAn SSL/TLS derived encryption layer to protect your data
ºMulticast tunneling
ºNAT traversal
ºAggregation of client responses, providing scalability
ºSupport for variable packet sizes, including jumbo frames
ºMore fine grained control of network timing/retransmission parameters

The code has also been completely restructured to be more readable and easier to update/support.

UFTP is an encrypted multicast file transfer program, designed to securely, reliably, and efficiently transfer files to multiple receivers simultaneously. This is useful for distributing large files to a large number of receivers, and is especially useful for data distribution over a satellite link (with two way communication), where the inherent delay makes any TCP based communication highly inefficient. The multicast encryption scheme is based on TLS with extensions to allow multiple receivers to share a common key. UFTP also has the capability to communicate over disjoint networks separated by one or more firewalls (NAT traversal) and without full end-to-end multicast capability (multicast tunneling) through the use of a UFTP proxy server. These proxies also provide scalability by aggregating responses from a group of receivers. UFTP has been used in the production process of The Wall Street Journal to send WSJ pages over satellite to their remote printing plants, and other users have used it to send to over 1000 receivers.


Encrypted UDP based FTP: UFTP Protocol Summary

A UFTP session consists of 3 main phases: The Announce/Register phase, the File Transfer phase, and the Completion/Confirmation phase. The File Transfer phase additionally consists of the File Info phase and the Data Transfer phase for each file sent.

The Announce/Register phase sets up the multicast file transfer session and negotiates all encryption parameters. The server sends out an announcement over a public multicast address which the clients are expected to be listening on. All subsequent messages from the server go over a private multicast address specified in the announcement. Allowed clients send a registration to respond to the announcement. The server will then send either a confirmation message if encryption is disabled, or the encryption keys for the session if encryption is enabled. If the client receives the encryption keys, it sends an acknowledgment back to the server.

Encrypted UDP based FTP UFTP DocumentationThe File Transfer phase starts with the File Info phase for the first file to send. The server sends a message describing the file in question. Besides the name and size of the file, this message describes how the file will be broken down. A file is divided into a number of blocks, and these blocks are grouped into sections. A block is a piece of the file that is sent in a single packet, and a section is a grouping of blocks. The total number of blocks and sections is included in this message.

Continuing the File Transfer phase is the Data Transfer phase for the first file. Data packets, each of which is a block, are sent by the server at a rate specified by the user. Because UDP does not guarantee that packets will arrive in order, each block is numbered so the client can properly reassemble the file. When the server has finished sending all data packets, it sends a message to the clients indicating this.

When a client detects the end of a section or receives an end of file message from the server, and the client has detected one or more missing blocks, the client will send back a message containing a list of NAKs (negative acknowledgments). When the server receives NAKs from one or more clients, it goes back and retransmits any blocks that were NAKed, then continues on sending any untransmitted blocks. When a client has received the entire file, it sends a completion message in response to the server’s end of file message. This continues until all clients have either send a completion message or have timed out after the server sent its end of file message.

The File Info phase and the Data Transfer phase are then repeated for each file to be sent during the session.


The Completion/Confirmation phase shuts down the session between the server and clients. It starts with a message from the server indication the end of the session. The clients then respond with a completion message, and the server responds to each completion with a confirmation message.


Share:
Established in 2015. Offensive Sec Blog has been sharing security research, hacking tools, threat intelligence, and offensive security content since 2015.
Copyright © OffSec Blog | Powered by OffensiveSec
Design by OffSec | Built for the security community